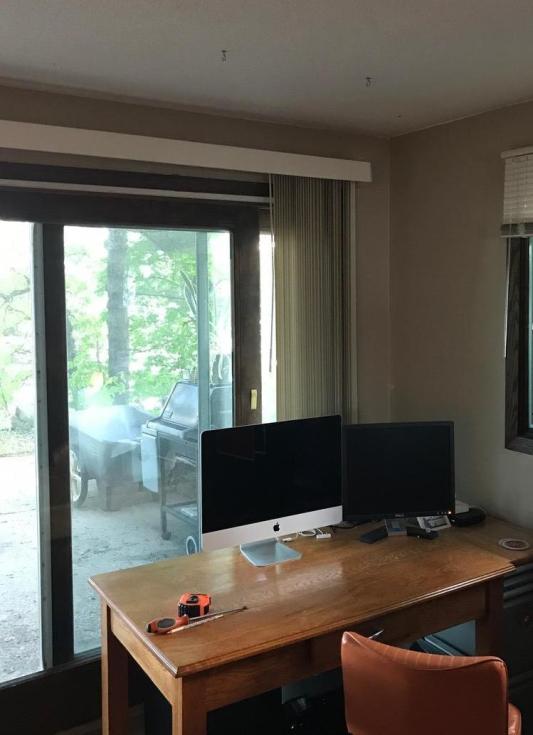
Living in a daylight basement in Central Minnesota, I had struggled to find a lighting solution for my “cave” that I found both functional and aesthetically pleasing. With an outlook onto a gorgeous lake, I had always positioned my work desk in front of the window, which was perfect during daytime hours, but offered no light fixture available in the immediate space during the evening hours. I needed a lighting solution that I could plug in, but also wanted it to hang from the ceiling and shine down on the work space, rather than be a floor lamp.
Before
I’ve always loved mid-century pieces, particularly ones with a more industrial feel, so I had an idea in mind of what I was looking for and set out to find the perfect lamps. I found a pair of filthy hanging lamps, stashed away in my brother-in-laws shed, and knew I could rewire them and restore them to their former glory. They had originally come from an art studio, built in the early 1960’s, and were the exact mix of vintage and industrial I was looking for.
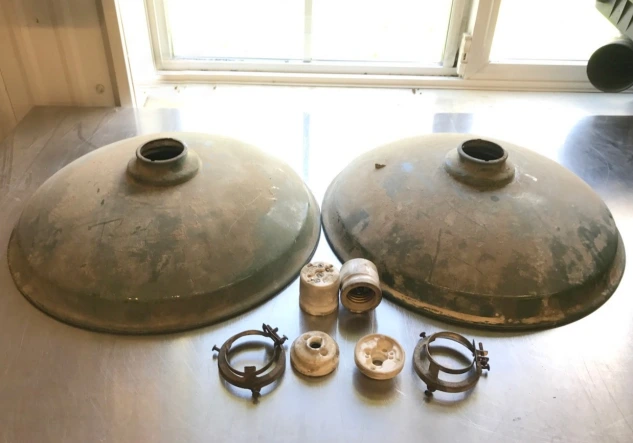
Circa 1960’s enamel lamps – Before
After cleaning off decades of grime, the enamel finish shone, and there was very little damage to the original finish.
After! Cleaned up and ready to wire.
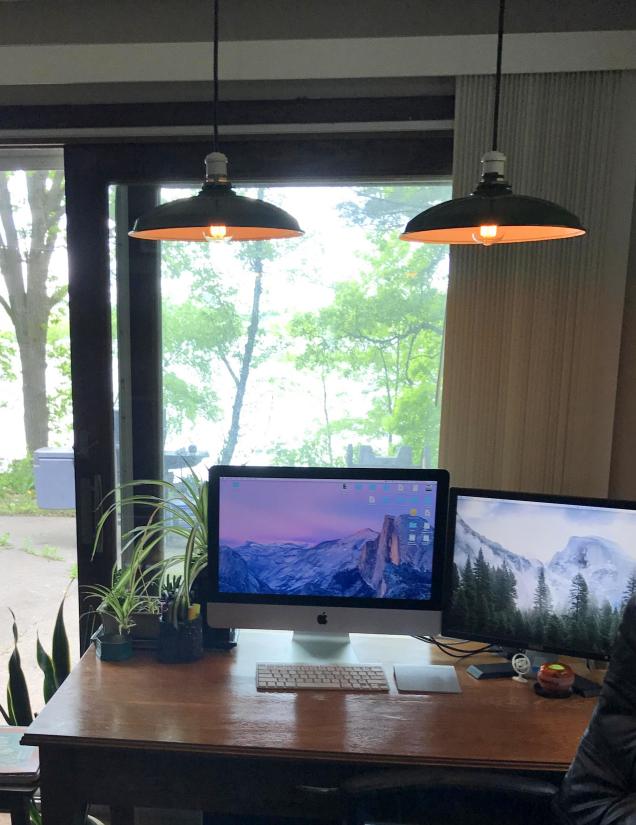
Next up, it was a simple rewire and they were ready to hang. I connected a dimmer switch to the outlet and added vintage style Edison bulbs to complete the look. I tidied up the wires using cable staples and absolutely love the final outcome!
After
Check out the slideshow below for more “after” images.
Happy 2017! We know that a lot of people were happy to see the back of 2016 but, for us, it was a great year. A big thank you to everybody that supported Atomic Magpie throughout the year! We look forward to the year ahead.
Happy New Year from Atomic Magpie!
Now, on with the show! The pile of “future projects” has been growing in the garage, and New Year’s Day seemed like a great time to tackle one. It was a quick and easy one, but fun none the less. It made a teensy dent in the pile, but some progress is better than none, right?
I picked up a pair of small, vintage stools for a couple of bucks on a local sell site a few months back, and when I was looking for a new place to put a plant in my bathroom, I knew exactly what I wanted to do.
The “for sale” photo
I started off by wiping the whole piece down with a damp cloth, and lightly sanding the legs and wiping it down again. There was no rust, so prep was minimal on this one.
No rust = easy prep!
After unscrewing the seat from the legs, I grabbed my ever trusty Rustoleum Metallic Gold and went to work. A couple of coats and it was done.
Seat beforeLegs before (see the foil on the bottom?)
I knew I wanted a two tone look, so I decided to go with a gold dipped look for the legs. I measured the legs and used aluminum foil to cover up the part I wasn’t painting. This is an old trick I’ve used for a while, easy to put on and off, and no risk of tape taking off any paint. The color I used was Rustoleum’s Ocean Mist. It’s a pastel, minty color that looks divine with a gold accent. I love it!
Tin foil is your friend!
Put the whole thing back together, and voilà! Done. The perfect height and size for the spot I need it in…and, if I’m ever in a pinch for extra seating, I have a stool!
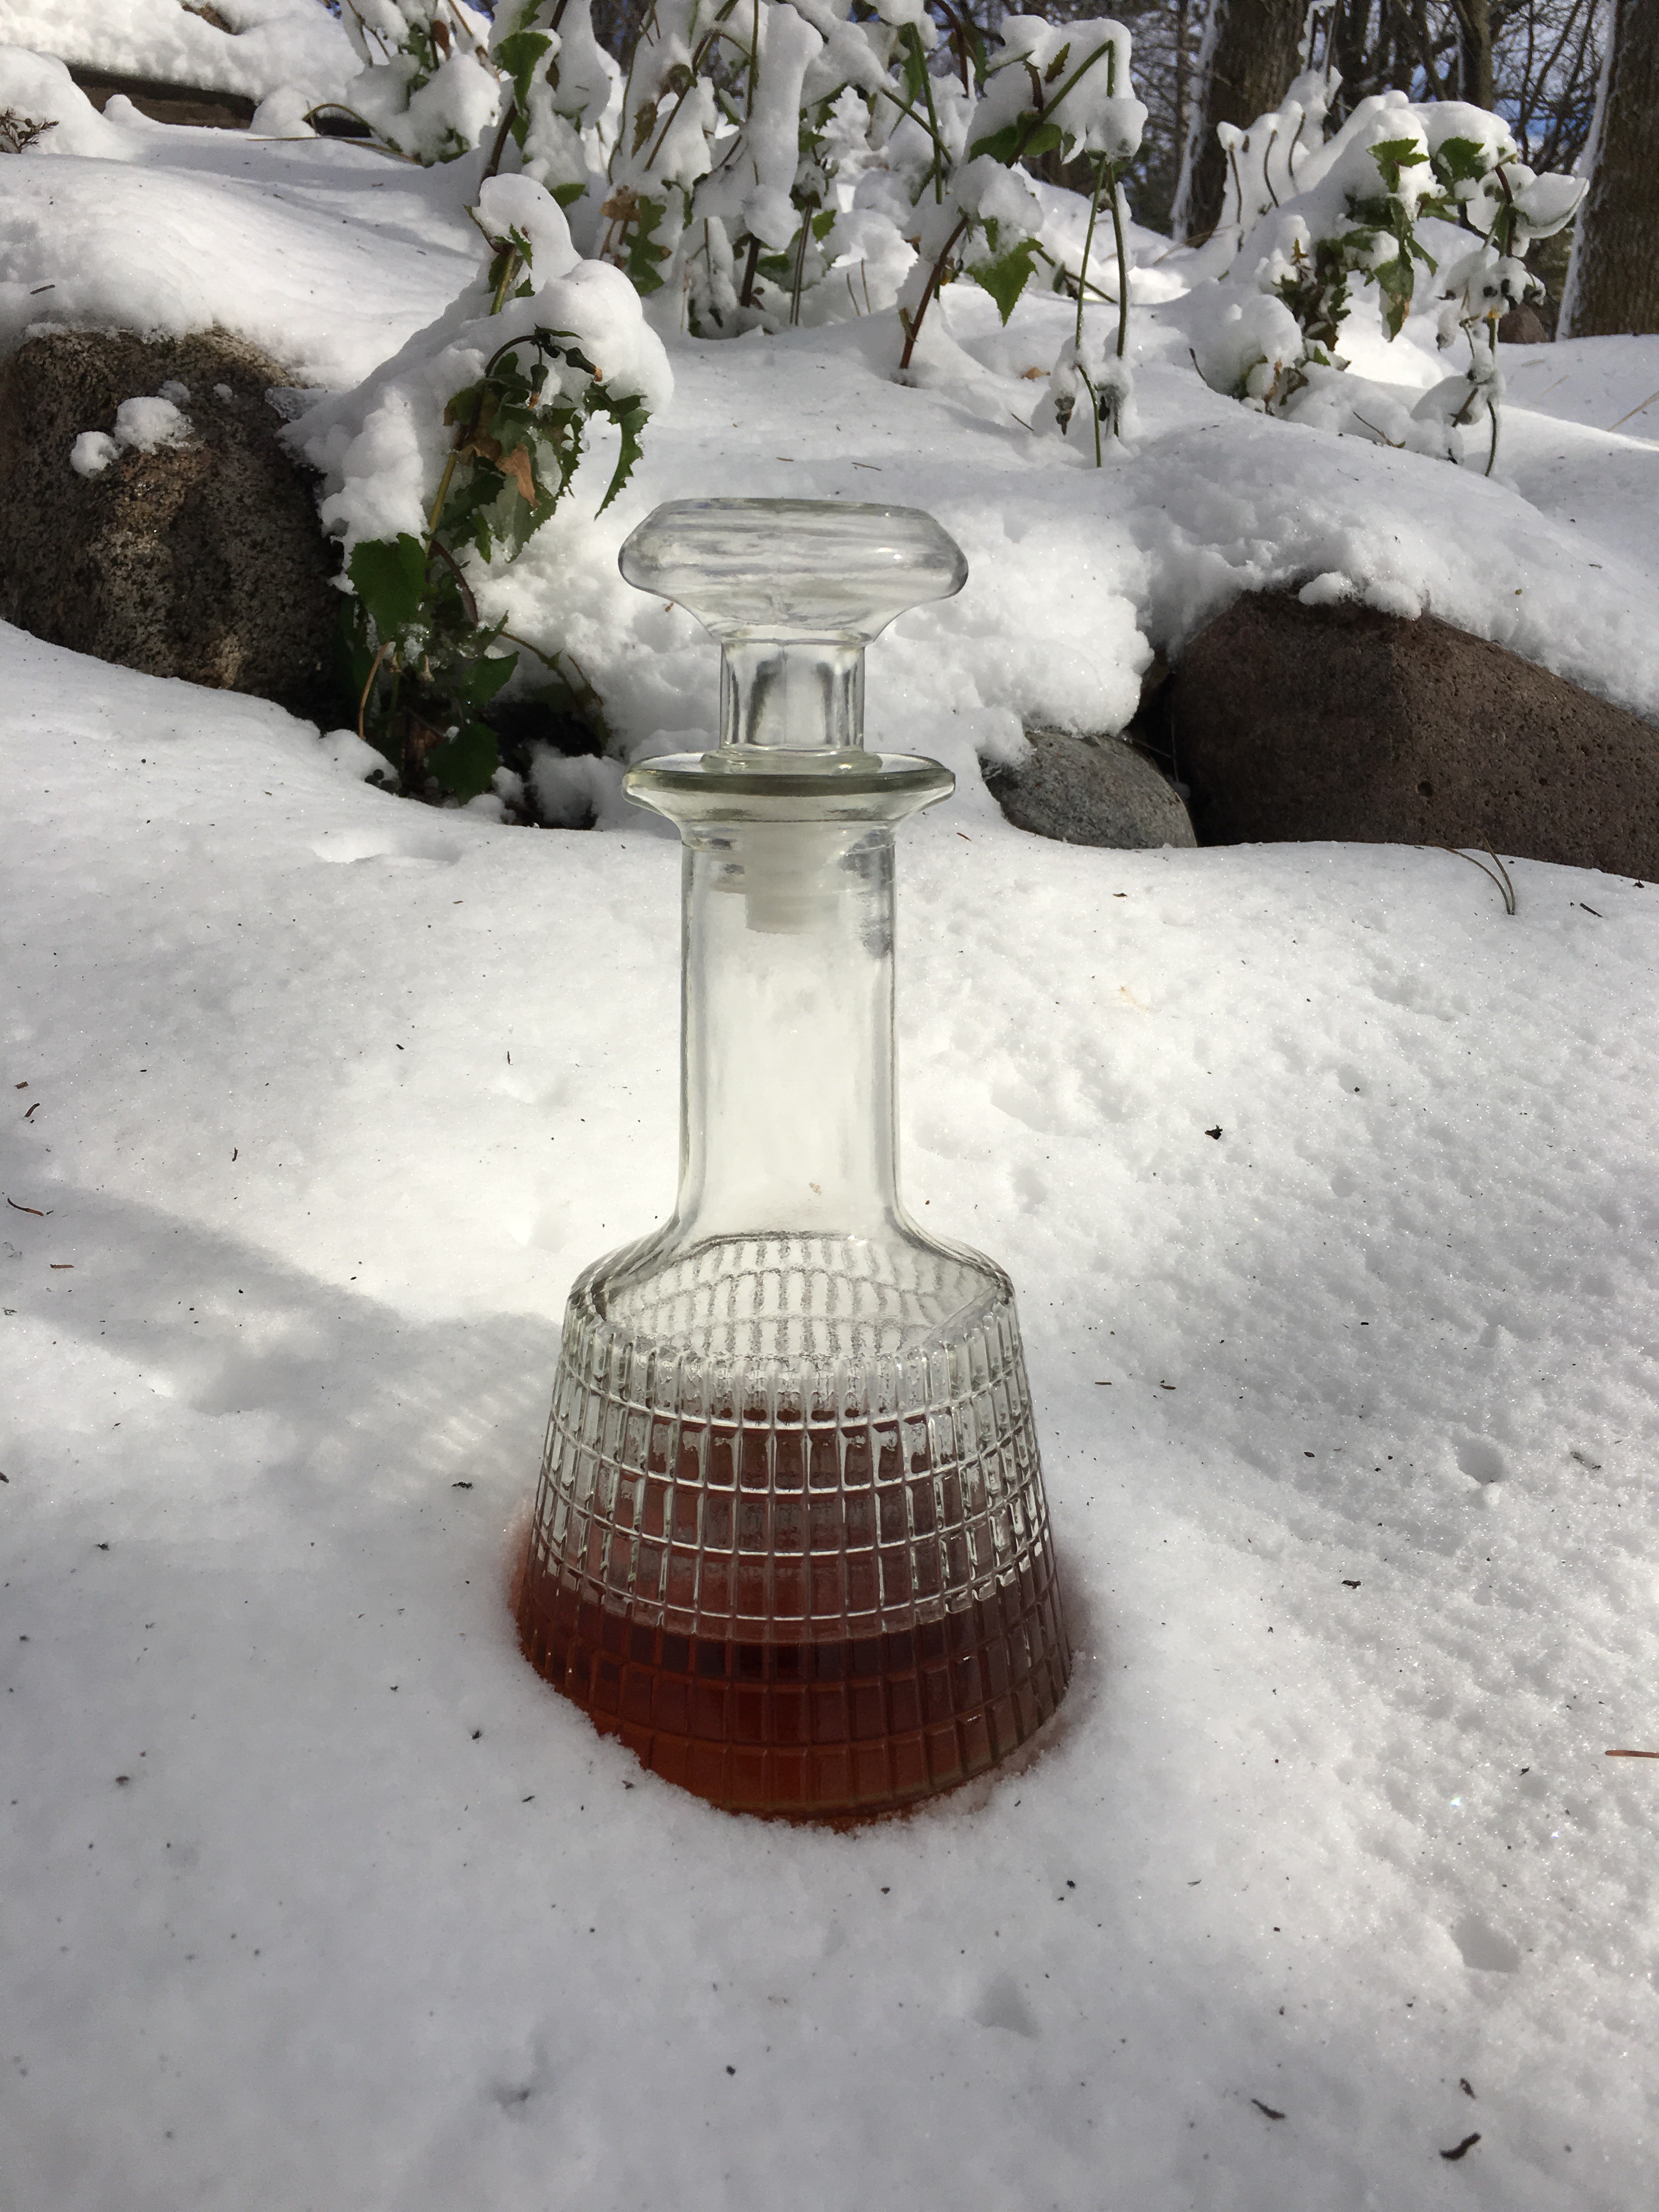
Several times a year, the Mid-West beckons and I come running. From the prairies, to the corn fields, I love the rural serenity and wide open spaces. Oh, and then there’s the lakes. All 10,000 of them!
1960’s whisky decanter and the first snow of the season. (Central MN)
What I also love, is the abundance of amazing mid century pieces to be found. At the end of every visit, when I head back to California, my carry on luggage is usually loaded with Pyrex and coffee pots. At some point or another, I’ve had footstools and lamps, fondue pots and Franciscan ware, all carefully stuffed in my suitcase.
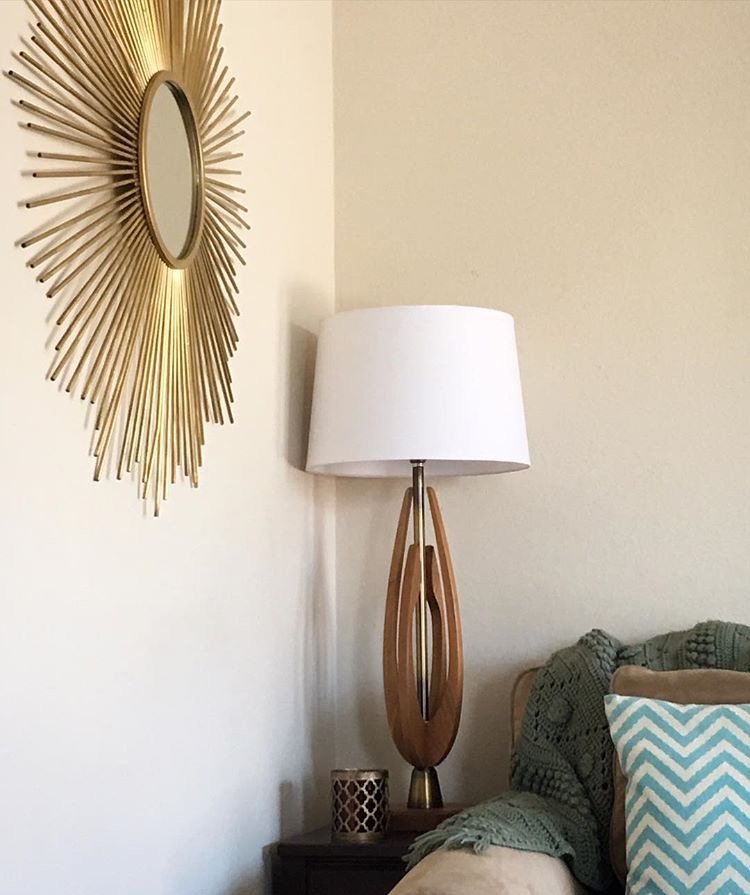
1950’s Danish modern lamp & hand knitted throw. (Stearns County, MN)
I have this theory that people in the Mid-West don’t live with the same “disposable” mentality as many of the rest of us. That the kitchen canister set someone got as a wedding gift in 1966, is the same one in their kitchen until the day they die. Now, clearly there is no science behind this theory, but there has to be some explanation for the volume of incredible, well treated pieces I always find there.
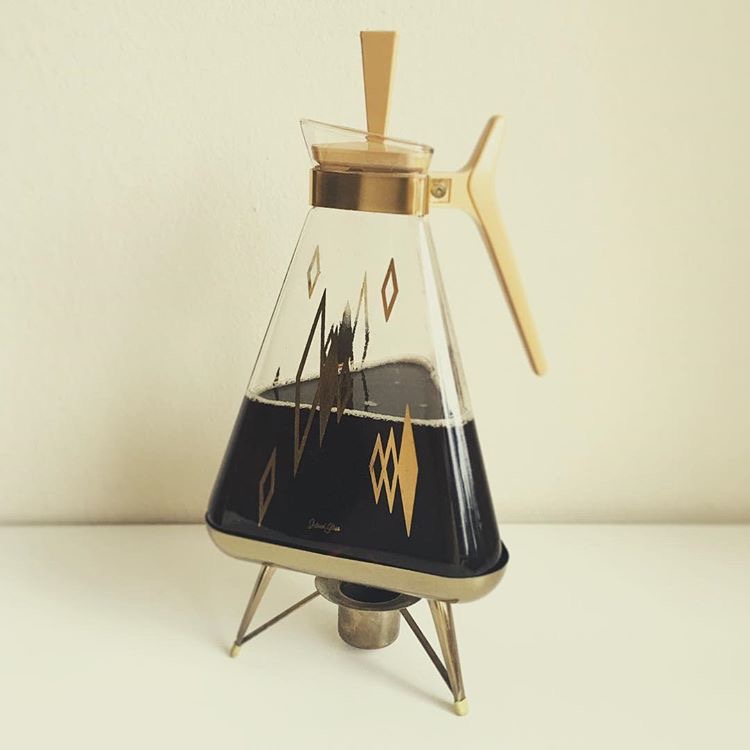
Inland Glass Coffee Pot. (Minneapolis, MN)
A lot of manufacturing in mid century America, was found in the Mid West and surrounding states. I’m sure this also has something to do with it. Whatever it is, I get excited any time I have a free day to go searching for treasures. And the results have always been fantastic and rewarding!
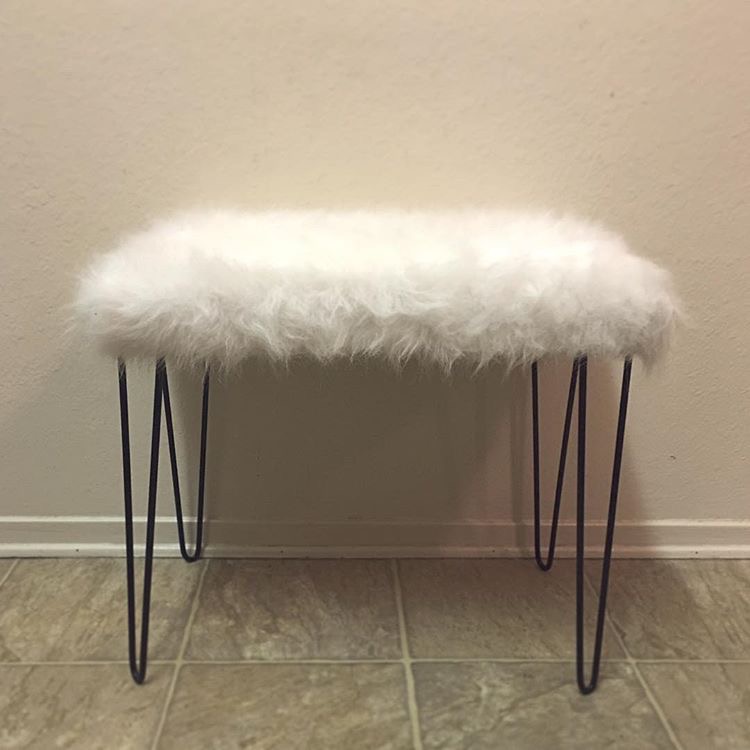
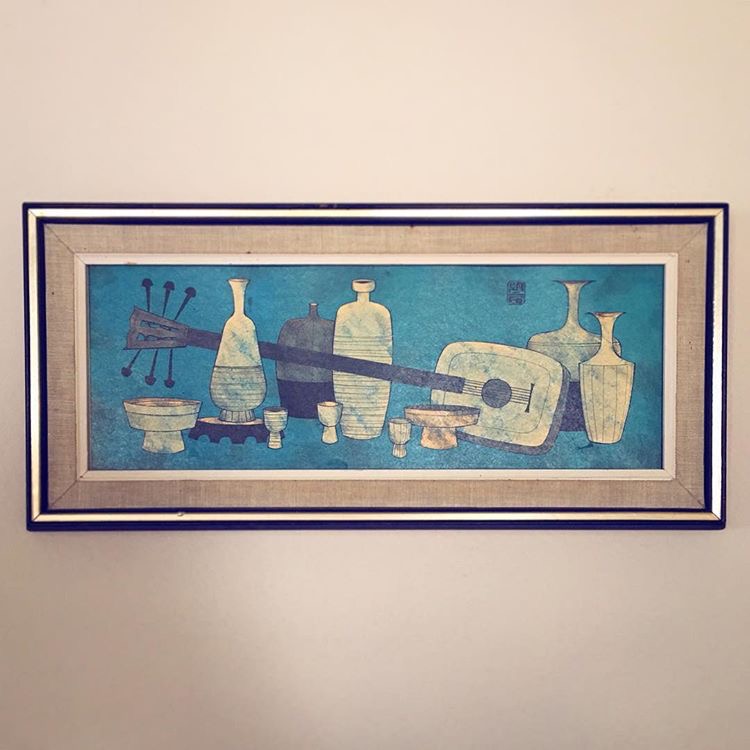
Hairpin legged footstool, found at “Pioneer Days” (Albany, MN) Restored and updated by us.1960’s Turner Wall Art print. (South Dakota)
Recently, we had a customer ask us to find them a mid century era piece to use as a bar in a man cave. Something steampunkish and industrial, vintage and clean lined. So when I stumbled across this awesome 1960’s rolling metal typing desk stashed behind some old bookshelves and a discarded desk, I knew I’d found “the one”.
Hidden away behind a pile of old furniture…bingo!This style of desk was a staple in many offices during the 60’s & 70’s, and this beauty still had the original government “Property of…” sticker on the underside. The only thing that would have made this desk any cooler would have been the words “CIA” or “FBI” (instead of the County office in which it once resided). Isn’t she lovely? Vintage Kromex Ice BucketLoaded with a cool c. 1952 whiskey decanter, some retro cocktail tumblers and a shiny, vintage Kromex ice bucket (you should really check out our store!) this bar quickly took shape. 1950’s decanter – sweet bar accessories are a must!Sturdy & vintage, this bar cart is a cool piece of history – I wonder if the person who once sat typing at this desk daily, ever imagined it would one day serve this very swoon inspiring function?
Cheers!This piece really didn’t require much restoration, it was in great shape. Custom wooden wine bottle racks slide on to the bottom shelf and there is room for hanging wine glasses underneath. Perfect!
I love mid century decor and heaven knows my house borders on being a museum, but sometimes the price sticker for an original piece can quickly put something out of reach (and straight onto my wish list!).
I’ve wanted a vintage starburst mirror for ages, but I’ve never found one that I loved enough to spend the big bucks on. So when I saw this rusty, beat up, department store effort on a local swap and sell site (FOR FREE!), I knew I could make it (aka fake it) into something that scratched my Mid Century Starburst itch…well, for now anyway!
Before. A little bit tacky and way too bedazzling
Before I continue, I need to confess – this thing sat in my garage for months before I touched it. In fact, I avoided it….refusing to even look at it. I’m not sure why exactly, but now that it’s done, I wonder why I was so intimidated by a piece of metal. Anyhoo, I digress. This mirror was rusty and grimy. The smaller mirrors were either falling off or gone, which was ok because I hated them. And that was the first step – after removing the large center mirror for safety, I used pliers and pushed/popped the smaller mirrors off. This was not too hard as many of the joins had rusted.
Mangled baby mirrors
I worked my way around the frame until all the small mirrors were gone. As bad as the rust looks in the photos, thankfully it was only surface deep, and none of the rods had rusted through.
Is it seven years bad luck if you break a mirror deliberately?
Once I had removed all the small mirrors, I wiped the whole thing down with a wet rag. This is where it got a little messy. A lot of the paint starting flaking off in chunks where the rust had lifted it. These chips of paint stuck to everything – the rag, my hands, the drop cloth, you name it. After removing as many of the obvious paint flakes as I could, I went over the whole thing thoroughly with 200 grit sandpaper to remove peeling paint and rust. This part was laborious, mostly because every time I thought I was done, I’d see another patch I had missed. I’d say I spent about an hour sanding. Not my favourite thing to do, but necessary.
Almost there!
Once I had gotten as much of the rust and paint off as possible, I sprayed the whole thing with a coat of Killz primer with rust protection. I then followed up with 3 coats of my ever trusty Rustoleum Metallic Gold. It is by far my favourite gold spray paint, I love the final colour and tone.
And there you have it! A modern day starburst mirror, with a mid century vibe. Love it!
Here at Atomic Magpie, we spend as much of our time cleaning and restoring vintage items as we do sourcing them. Pieces that are 40+ years old come in all conditions. From pristine and barely used to well loved, thrashed and modified.
Looking past decades of paint, grime and use can be challenging. That said, seeing good bones underneath 1980’s seafoam green paint and then restoring the item to its original glory is extremely satisfying.
Along the way I have picked up many handy hints and tricks for restoring items, and this post is going to talk about one of them.
Before. These Danish modern candlesticks covered in paint, have seen better days
This gorgeous pair mid century Danish modern candlesticks had been gold spraypainted (badly). Maybe the original owner didn’t feel like polishing them? Or wanted a matte finish? One can only guess, but they were covered in an uneven, drippy coat of paint and looked miserable.
A close up of the sadness
Here’s where the fun starts! After doing some research, I learned that brass expands when heated. Meaning that heating it would almost force the paint to come off. I’m no scientist, but this sounded legit, so onwards to heating the candlesticks.
After filling an old pot (that wasn’t going to be used for food again) with water and a shake or two of baking soda (I’m not big on measuring), I boiled the candlesticks for about 90 minutes.
The film of old paint appeared very quickly
The paint started to come off almost immediately – and stuck to the pot, which is why you should use an old one you don’t plan on using again for food prep. It should also be noted that it’s probably a good idea to do this in a well ventilated area, with the window open or an exhaust fan on. While the smell wasn’t terrible, it was present and, like all things old paint, you are never quite sure what you’re dealing with unless you’re the one that first painted it (lead anyone?)
Bubble , bubble, toil and trouble!
After removing the pieces from the pot, they were scrubbed gently with a regular kitchen sponge/scourer to get the remaining paint residue off. An engineer friend mentioned afterwards that it’s probably not a wise idea to put heated metal directly under cold water, as it can crack with the sudden heating and cooling/expanding and contracting. Brass is a softer metal so that doesn’t typically happen, but if you’re not 100% sure what type of metal you’re dealing with, take care with that step.
Last up, a quick polish with one of my faves – the ever trusty “Barkeepers Friend”. This stuff is amazing, and polished the brass in an instant. Pretty flash I think!
Recently, I picked up a couple of vintage tray tables for a few bucks. You know the kind, the ones that fold up and fit neatly down the side of your fridge or couch. Metal trays for eating TV dinners on the couch, all the rage in the 50’s and 60’s. They were in rough condition, but I loved the shape of the legs (anyone that follows my projects knows about me and great legs!)
Before. It’s hard to see how damaged the tray is, but it was
I knew the tray tops were pretty close to unsalvageable, as they were dinged and rusty and chipped. It’s hard to tell from the photos just how beat up the trays were, but trust me, they were. When it comes to vintage furniture, I’ll almost always attempt a restoration over a revamp, but alas it wasn’t an option this time. The legs were in much better shape, so I set about to repurpose them. I wiped them down with a wet rag and lightly sanded them with 200 grit sand paper. Next I applied a thin coat of Kilz spray on primer with rust protection. I did the same to the trays, just to see how they might look with some paint on them (the answer is – not much better). Accepting that the trays were beyond help, as I had originally figured, I decided to ditch them and move onto another plan. I’m all about the legs! I covered the black feet caps with painters tape and applied two coats of Rustoleum’s metallic gold paint to the legs, making sure I gave them plenty of time to dry in between coats. I finished them with a quick spray of Rustoleums clear coat.
I had an old wooden tray lying around that was the perfect size to fit in the legs, it even had a ledge on the bottom, so the legs just clipped in without sliding all the way open. I painted the tray with Rustoleum’s flat black. Once it had dried fully, I found some awesome paper, which I cut to the size of the tray. Using Mod Podge, I applied a thin layer to adhere it and, when it dried, I applied another layer over the top to seal. After my Peacock table makeover and the Mod Podge freak out I had then, I knew the bubbles this time were normal and would go away once dried, which they did. Easy. Voila! A portable bar table
So there you have it. A quick and simple repurpose – from a TV dinner tray table, to a sweet, portable bar table. Easy and fab!Cocktail time!
Once in a while I come across a makeover project that makes me think “oh, easy!” and this little sewing cabinet was no exception. I mean, lots of flat surfaces and straight lines, an easy strip, stain and seal and “Bob’s your uncle!” Well, no. Not this time. I loved this little table from the get-go, I hated it for moments, but in the end, I’m still enamored. That top drawer that flips around to hold bobbins and reels, so unusual and unique. Hard to pass up.
So unique!
It wasn’t the 50 years of peeling paint underneath that was work, it was the freshest coat that had been slapped on top recently to cover it that made this project a sticky, messy nightmare. And all those straight lines? Hmm, yes, well, except for the grooves on the trim. The MANY grooves on the trim. Not fun. And then there’s the drawer fronts. Yep, they’re flat alright, flat…but textured. With this odd layer of some kind of raffia or thatched laminate stuff. Stripping wasn’t even an option for those parts.
So many layers!
So to say the prep was difficult, is an understatement. This wee gem took days of paint stripping, and for moments, a little piece of my soul. Then, those grooves…well, I tried everything from scrapers to wire brushes to steel wool to skewers. I finally got there, but in hindsight, sandblasting would have been the more effective option. Note to self.
Groovy. But not really.
Next up, sanding. This part was the easiest of all. My snazzy Black & Decker orbital sander whizzed through and made the surface silky smooth in a jiffy. Things were looking up, because the last step in front of me, staining, is the easiest thing ever, right? I tried Minwax stain in Special Walnut, it’s a favorite of mine. And do you think this wood would take the stain? Oh puhlease, no way. Admittedly, there were two types of wood in this cabinet, and in my enthusiasm I didn’t consider the impact this may have on the staining process….which was evidently huge. So the stain on top looked great, on the sides looked OK, and on the front, looked awful. It was a patchy, streaky mess, no matter what I tried.
Sanding = the only easy part
It was at this point I went back to the trusty internet and this is where Gel Stain SAVED THE DAY. Gel stain, unlike traditional stain, is more like a paint. So it doesn’t soak into the wood, it sits on the surface. It’s a similar process, wipe on, wipe off, but the result was perfection. I used Minwax Gel stain in Hickory, and it was a rich, gorgeous tone that still let the wood grain shine through. Most importantly, it was even, smooth and consistent. Not a streak in sight. This stuff is GLORIOUS.
Gel Stain saves the day
The last step was the drawer fronts which, as mentioned earlier, were this weird textured stuff which I actually kinda liked the look of, but wasn’t able to strip or stain (or remove completely without having to replace the entire face of the drawers. More effort than I was willing to put in at this point). So I painted. I had some amazing aqua blue “Island Oasis” paint left over from a table makeover, so I used that. A couple of chrome drawer knobs later, and a coat of Minwax polyurethane to seal the whole thing, and the cabinet looks stunning.
Aqua & Chrome. Swoon!
Worth the labor intensive process (I can say that now it’s over and I’m not knee deep in paint stripper and desperation)
We love hearing from people that have purchased our treasures, and this time is no exception. This amazing Lustro-ware kitchen canister set found a new home for itself and looks just fab (especially right next to that sweet retro coffee maker!) We love the gold lettering on the creamy white background.
Lustro-ware was hugely popular in the 1950’s & 60’s, and found in kitchens across America. Their canister sets covered all the bases for dry goods – bread, flour, tea, coffee, sugar, cookies & more. But Lustro-ware didn’t stop at canisters, they had household items galore, from wastebaskets to juice squeezers to ice buckets and everything in between.
If you’ve purchased something from us that you’d like to share, we’d love to see it in its new home! Email us a photo here
For more Lustro-ware items, as well as a selection of kitchen canisters by Mirro, WestBend & others, check out our store.
Sarah from Atomic Magpie scored this sweet but battle scarred end table and transformed it into a thing of beauty. Here’s how she did it.
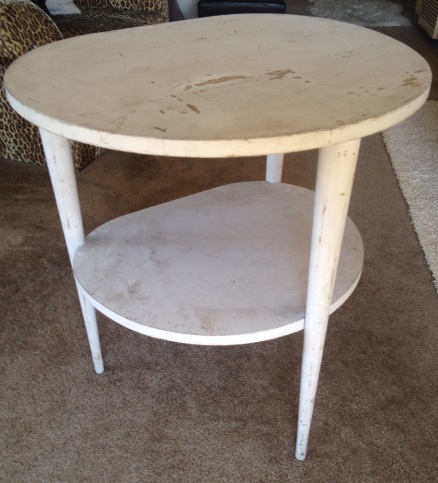
A few weeks back I found this beat up little end table on a local swap and sell site. Wedged in a corner, covered in office junk, paint scratched and dirty, and looking generally pretty sad. To many, not worth a second glance…but those legs! One look at the tapered legs, and this table screamed out “buy me! Save me! I am fabulous waiting to happen!” and I knew it had to be my next project.
Before, sad and dingy
I determined pretty quickly that the table was solid wood, covered with layers of lousy paint jobs over the original varnish. So I set about stripping the layers of dirt, paint and stain off, and uncovered a few little surprises along the way. The first happy surprise I unearthed was the brass ferrules on the feet of the table. Covered in decades of paint, these beauties were the cause of great excitement. A staple of mid-century design, I adore brass tipped table legs, and these ones were fantastic.
Oh the joy! Brass Ferrules
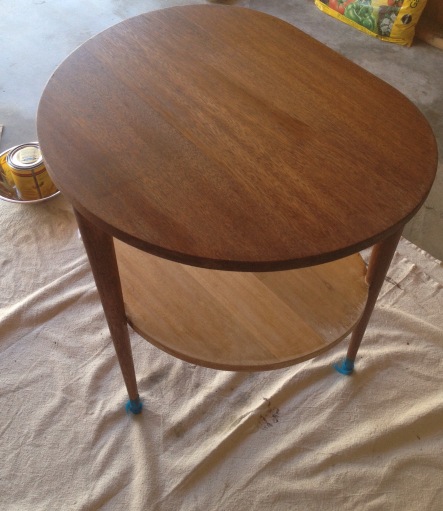
Next up, after stripping the top using an Eco-friendly, low fume paint stripper that I was able to use indoors (EZ Strip, Paint & Varnish Stripper) I found that I had in front of me a gorgeous mahogany table top, with a few water stains here and there, but nothing some sanding couldn’t remedy. The legs were a bit more work, requiring a lot of elbow grease, paint stripper and a wire brush. But it got there, and soon I had before me a stripped clean wooden end table with endless possibilities.
Uncovered – water stains and Mahogany
I sanded the whole table using a handheld block sander with 100 grit sandpaper. I finished with a fine sandpaper (220 grit) The good condition of the wood, and the stunning grain, made it an easy choice for staining rather than painting. I chose Minwax Special Walnut as the stain, and used a lint free rag to wipe it on, and then off. I did about 6 coats to get the colour I wanted, and had a couple of minor hiccups along the way, mostly with the legs and some small spots of old varnish I had missed. A quick go over with sandpaper on those spots, a touch more stain and the problem was solved.
Stripped and one coat of stain down
Early on, it was decided a pop of color would really make this table shine. Wanting to stick with the mid-century feel of the table, I chose a vibrant Aqua blue paint for the bottom shelf (Island Oasis by Home Depot, in matte/flat finish)
A quick coat of Minwax polyurethane over the whole table, and the old ketchup trick to polish the brass ferrules, and the end result was quite stunning.