Wow, we can’t believe it has been a year since our little mid century table makeover! Not only was the response on social media amazing, but it was featured on one of our very favourite design websites, Apartment Therapy, as one of their Before & After projects! It also appeared on the Norwegian design website “Kreative Ideer”. So cool!
Click on the photo to check out the story behind this fab table makeover!
Once in a while I come across a makeover project that makes me think “oh, easy!” and this little sewing cabinet was no exception. I mean, lots of flat surfaces and straight lines, an easy strip, stain and seal and “Bob’s your uncle!” Well, no. Not this time. I loved this little table from the get-go, I hated it for moments, but in the end, I’m still enamored. That top drawer that flips around to hold bobbins and reels, so unusual and unique. Hard to pass up.
So unique!
It wasn’t the 50 years of peeling paint underneath that was work, it was the freshest coat that had been slapped on top recently to cover it that made this project a sticky, messy nightmare. And all those straight lines? Hmm, yes, well, except for the grooves on the trim. The MANY grooves on the trim. Not fun. And then there’s the drawer fronts. Yep, they’re flat alright, flat…but textured. With this odd layer of some kind of raffia or thatched laminate stuff. Stripping wasn’t even an option for those parts.
So many layers!
So to say the prep was difficult, is an understatement. This wee gem took days of paint stripping, and for moments, a little piece of my soul. Then, those grooves…well, I tried everything from scrapers to wire brushes to steel wool to skewers. I finally got there, but in hindsight, sandblasting would have been the more effective option. Note to self.
Groovy. But not really.
Next up, sanding. This part was the easiest of all. My snazzy Black & Decker orbital sander whizzed through and made the surface silky smooth in a jiffy. Things were looking up, because the last step in front of me, staining, is the easiest thing ever, right? I tried Minwax stain in Special Walnut, it’s a favorite of mine. And do you think this wood would take the stain? Oh puhlease, no way. Admittedly, there were two types of wood in this cabinet, and in my enthusiasm I didn’t consider the impact this may have on the staining process….which was evidently huge. So the stain on top looked great, on the sides looked OK, and on the front, looked awful. It was a patchy, streaky mess, no matter what I tried.
Sanding = the only easy part
It was at this point I went back to the trusty internet and this is where Gel Stain SAVED THE DAY. Gel stain, unlike traditional stain, is more like a paint. So it doesn’t soak into the wood, it sits on the surface. It’s a similar process, wipe on, wipe off, but the result was perfection. I used Minwax Gel stain in Hickory, and it was a rich, gorgeous tone that still let the wood grain shine through. Most importantly, it was even, smooth and consistent. Not a streak in sight. This stuff is GLORIOUS.
Gel Stain saves the day
The last step was the drawer fronts which, as mentioned earlier, were this weird textured stuff which I actually kinda liked the look of, but wasn’t able to strip or stain (or remove completely without having to replace the entire face of the drawers. More effort than I was willing to put in at this point). So I painted. I had some amazing aqua blue “Island Oasis” paint left over from a table makeover, so I used that. A couple of chrome drawer knobs later, and a coat of Minwax polyurethane to seal the whole thing, and the cabinet looks stunning.
Aqua & Chrome. Swoon!
Worth the labor intensive process (I can say that now it’s over and I’m not knee deep in paint stripper and desperation)
There’s lots going on here at Atomic Magpie! We have a number of fantastic mid-century furniture makeover projects underway, and we are really excited to share them – just as soon as the paint is stripped, the stain is set and the brass polished.
Also on the horizon are some amazing new finds fresh from Australia. They landed Stateside last week, and will be hitting our store in the coming weeks. Our magnificent vintage treasures include a stunning enameled cookware pair by Siltal of Italy, a retro-fabulous red ice bucket by Decor Australia, an AGEE Pyrex bowl and some other absolute gems. We’ll be sure to post more info once we have them listed in our store!
In the mean time, we’re going to share with you this sweet trio (or “a pair & a spare” as we like to say) of coffee mugs by Arcoroc of France. The are tres’ chic, and feature one of our most favorite colors – turquoise. In the popular Jardiniere design, featuring ribbed rings around the mugs, these tempered beauties are fab!
Sarah from Atomic Magpie scored this sweet but battle scarred end table and transformed it into a thing of beauty. Here’s how she did it.
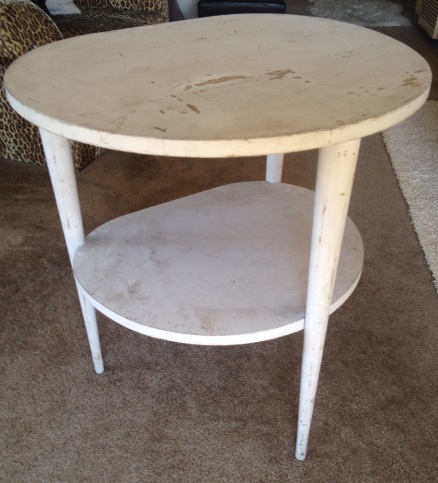
A few weeks back I found this beat up little end table on a local swap and sell site. Wedged in a corner, covered in office junk, paint scratched and dirty, and looking generally pretty sad. To many, not worth a second glance…but those legs! One look at the tapered legs, and this table screamed out “buy me! Save me! I am fabulous waiting to happen!” and I knew it had to be my next project.
Before, sad and dingy
I determined pretty quickly that the table was solid wood, covered with layers of lousy paint jobs over the original varnish. So I set about stripping the layers of dirt, paint and stain off, and uncovered a few little surprises along the way. The first happy surprise I unearthed was the brass ferrules on the feet of the table. Covered in decades of paint, these beauties were the cause of great excitement. A staple of mid-century design, I adore brass tipped table legs, and these ones were fantastic.
Oh the joy! Brass Ferrules
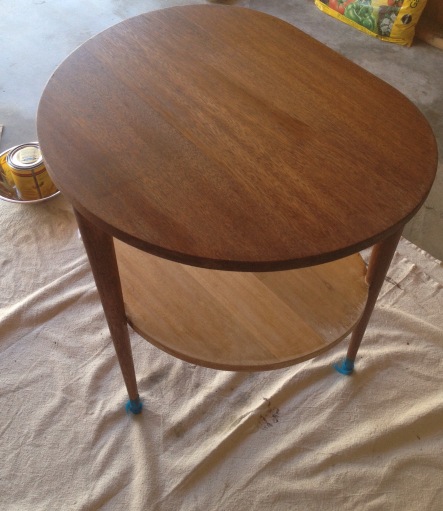
Next up, after stripping the top using an Eco-friendly, low fume paint stripper that I was able to use indoors (EZ Strip, Paint & Varnish Stripper) I found that I had in front of me a gorgeous mahogany table top, with a few water stains here and there, but nothing some sanding couldn’t remedy. The legs were a bit more work, requiring a lot of elbow grease, paint stripper and a wire brush. But it got there, and soon I had before me a stripped clean wooden end table with endless possibilities.
Uncovered – water stains and Mahogany
I sanded the whole table using a handheld block sander with 100 grit sandpaper. I finished with a fine sandpaper (220 grit) The good condition of the wood, and the stunning grain, made it an easy choice for staining rather than painting. I chose Minwax Special Walnut as the stain, and used a lint free rag to wipe it on, and then off. I did about 6 coats to get the colour I wanted, and had a couple of minor hiccups along the way, mostly with the legs and some small spots of old varnish I had missed. A quick go over with sandpaper on those spots, a touch more stain and the problem was solved.
Stripped and one coat of stain down
Early on, it was decided a pop of color would really make this table shine. Wanting to stick with the mid-century feel of the table, I chose a vibrant Aqua blue paint for the bottom shelf (Island Oasis by Home Depot, in matte/flat finish)
A quick coat of Minwax polyurethane over the whole table, and the old ketchup trick to polish the brass ferrules, and the end result was quite stunning.