Happy 2017! We know that a lot of people were happy to see the back of 2016 but, for us, it was a great year. A big thank you to everybody that supported Atomic Magpie throughout the year! We look forward to the year ahead.
Happy New Year from Atomic Magpie!
Now, on with the show! The pile of “future projects” has been growing in the garage, and New Year’s Day seemed like a great time to tackle one. It was a quick and easy one, but fun none the less. It made a teensy dent in the pile, but some progress is better than none, right?
I picked up a pair of small, vintage stools for a couple of bucks on a local sell site a few months back, and when I was looking for a new place to put a plant in my bathroom, I knew exactly what I wanted to do.
The “for sale” photo
I started off by wiping the whole piece down with a damp cloth, and lightly sanding the legs and wiping it down again. There was no rust, so prep was minimal on this one.
No rust = easy prep!
After unscrewing the seat from the legs, I grabbed my ever trusty Rustoleum Metallic Gold and went to work. A couple of coats and it was done.
Seat beforeLegs before (see the foil on the bottom?)
I knew I wanted a two tone look, so I decided to go with a gold dipped look for the legs. I measured the legs and used aluminum foil to cover up the part I wasn’t painting. This is an old trick I’ve used for a while, easy to put on and off, and no risk of tape taking off any paint. The color I used was Rustoleum’s Ocean Mist. It’s a pastel, minty color that looks divine with a gold accent. I love it!
Tin foil is your friend!
Put the whole thing back together, and voilà! Done. The perfect height and size for the spot I need it in…and, if I’m ever in a pinch for extra seating, I have a stool!
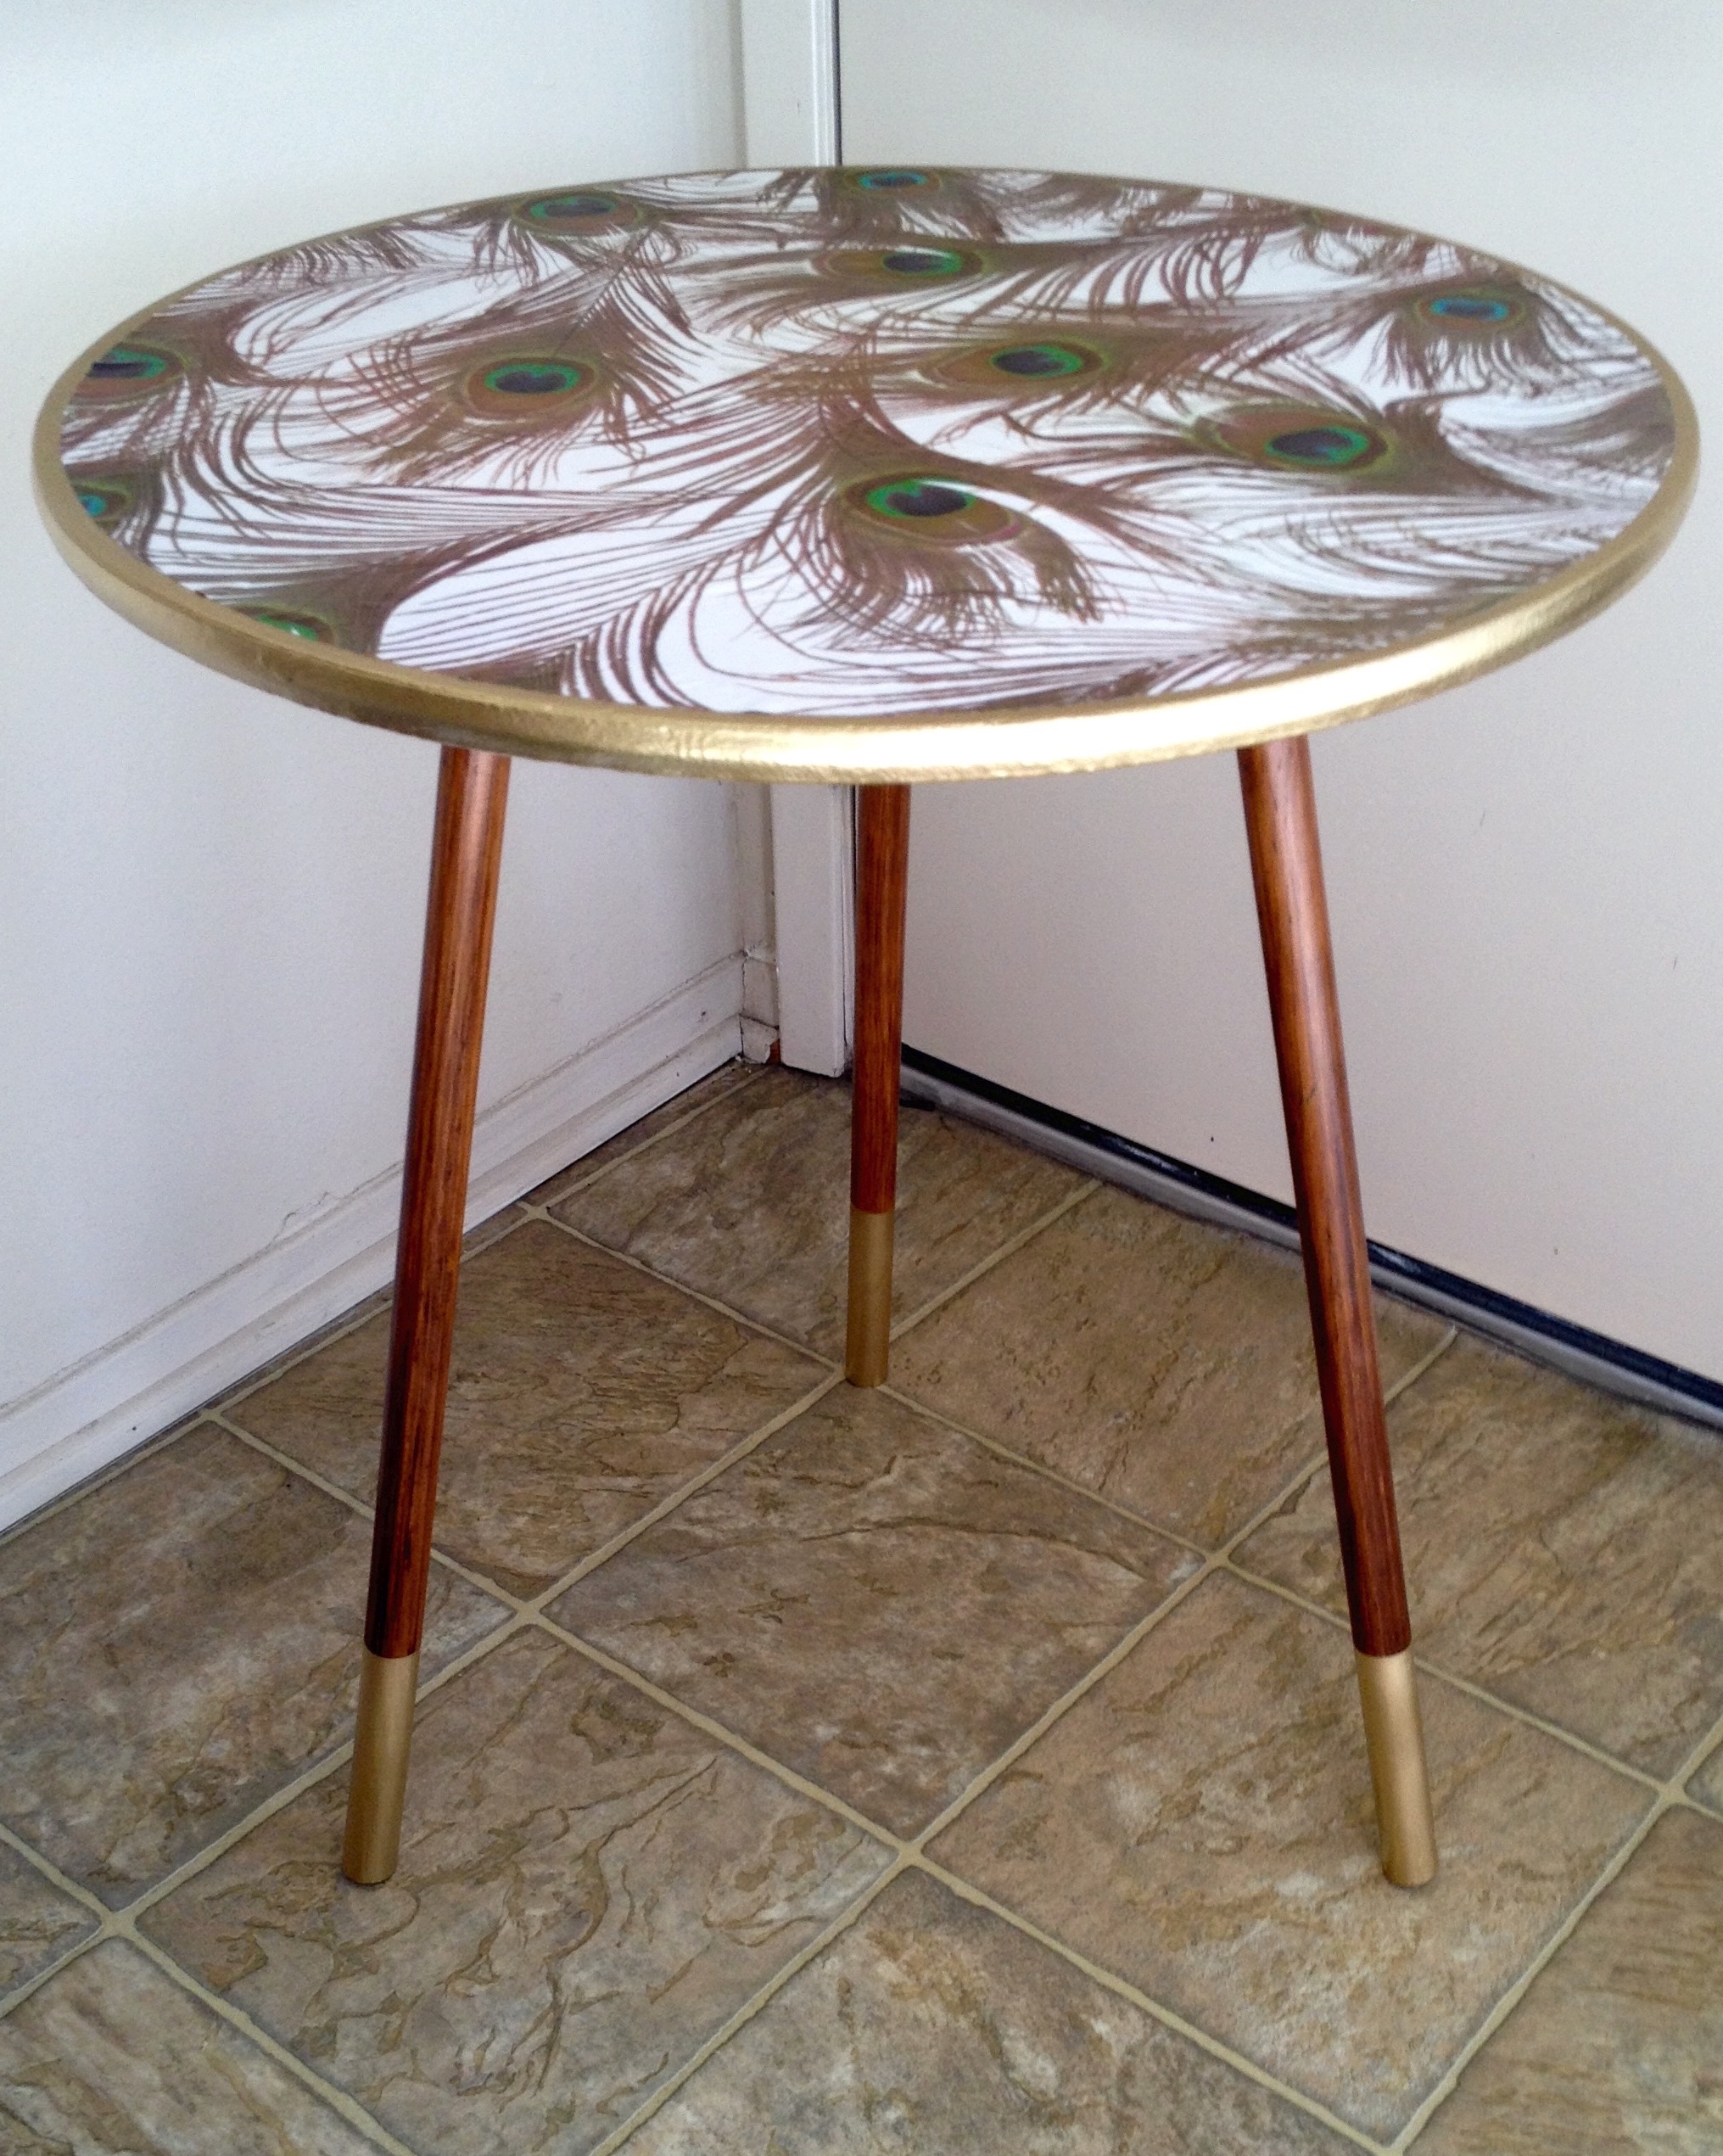
Wow, we can’t believe it has been a year since our little mid century table makeover! Not only was the response on social media amazing, but it was featured on one of our very favourite design websites, Apartment Therapy, as one of their Before & After projects! It also appeared on the Norwegian design website “Kreative Ideer”. So cool!
Click on the photo to check out the story behind this fab table makeover!
Recently, I picked up a couple of vintage tray tables for a few bucks. You know the kind, the ones that fold up and fit neatly down the side of your fridge or couch. Metal trays for eating TV dinners on the couch, all the rage in the 50’s and 60’s. They were in rough condition, but I loved the shape of the legs (anyone that follows my projects knows about me and great legs!)
Before. It’s hard to see how damaged the tray is, but it was
I knew the tray tops were pretty close to unsalvageable, as they were dinged and rusty and chipped. It’s hard to tell from the photos just how beat up the trays were, but trust me, they were. When it comes to vintage furniture, I’ll almost always attempt a restoration over a revamp, but alas it wasn’t an option this time. The legs were in much better shape, so I set about to repurpose them. I wiped them down with a wet rag and lightly sanded them with 200 grit sand paper. Next I applied a thin coat of Kilz spray on primer with rust protection. I did the same to the trays, just to see how they might look with some paint on them (the answer is – not much better). Accepting that the trays were beyond help, as I had originally figured, I decided to ditch them and move onto another plan. I’m all about the legs! I covered the black feet caps with painters tape and applied two coats of Rustoleum’s metallic gold paint to the legs, making sure I gave them plenty of time to dry in between coats. I finished them with a quick spray of Rustoleums clear coat.
I had an old wooden tray lying around that was the perfect size to fit in the legs, it even had a ledge on the bottom, so the legs just clipped in without sliding all the way open. I painted the tray with Rustoleum’s flat black. Once it had dried fully, I found some awesome paper, which I cut to the size of the tray. Using Mod Podge, I applied a thin layer to adhere it and, when it dried, I applied another layer over the top to seal. After my Peacock table makeover and the Mod Podge freak out I had then, I knew the bubbles this time were normal and would go away once dried, which they did. Easy. Voila! A portable bar table
So there you have it. A quick and simple repurpose – from a TV dinner tray table, to a sweet, portable bar table. Easy and fab!Cocktail time!
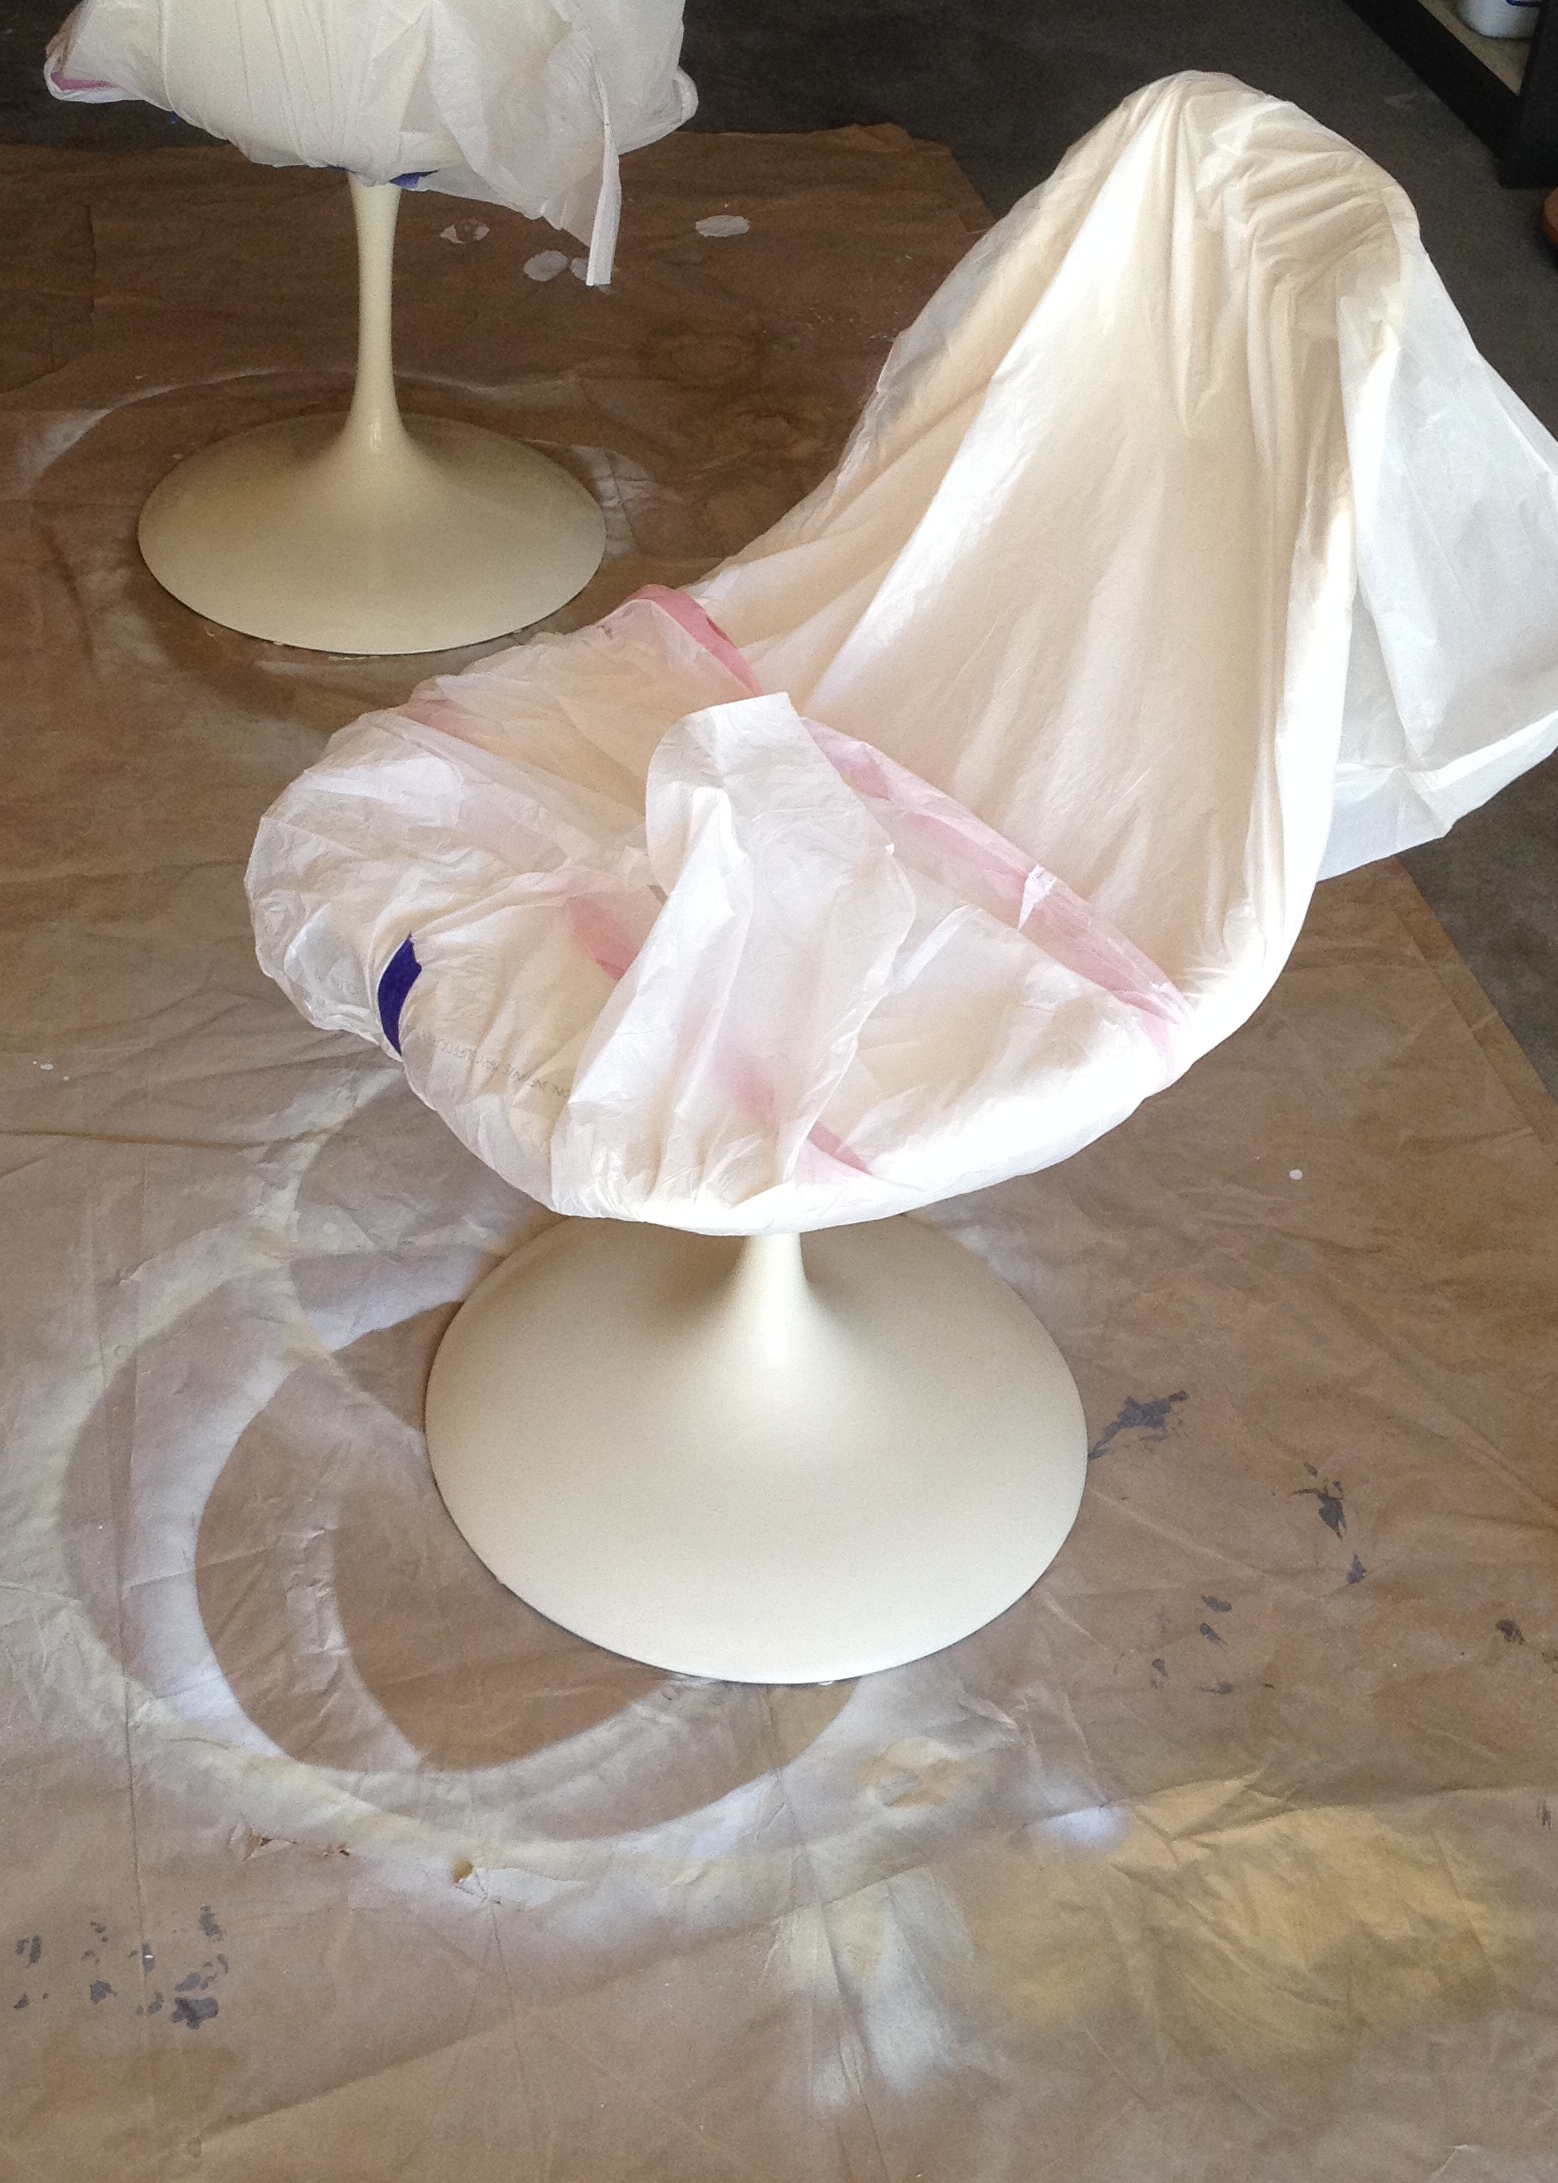
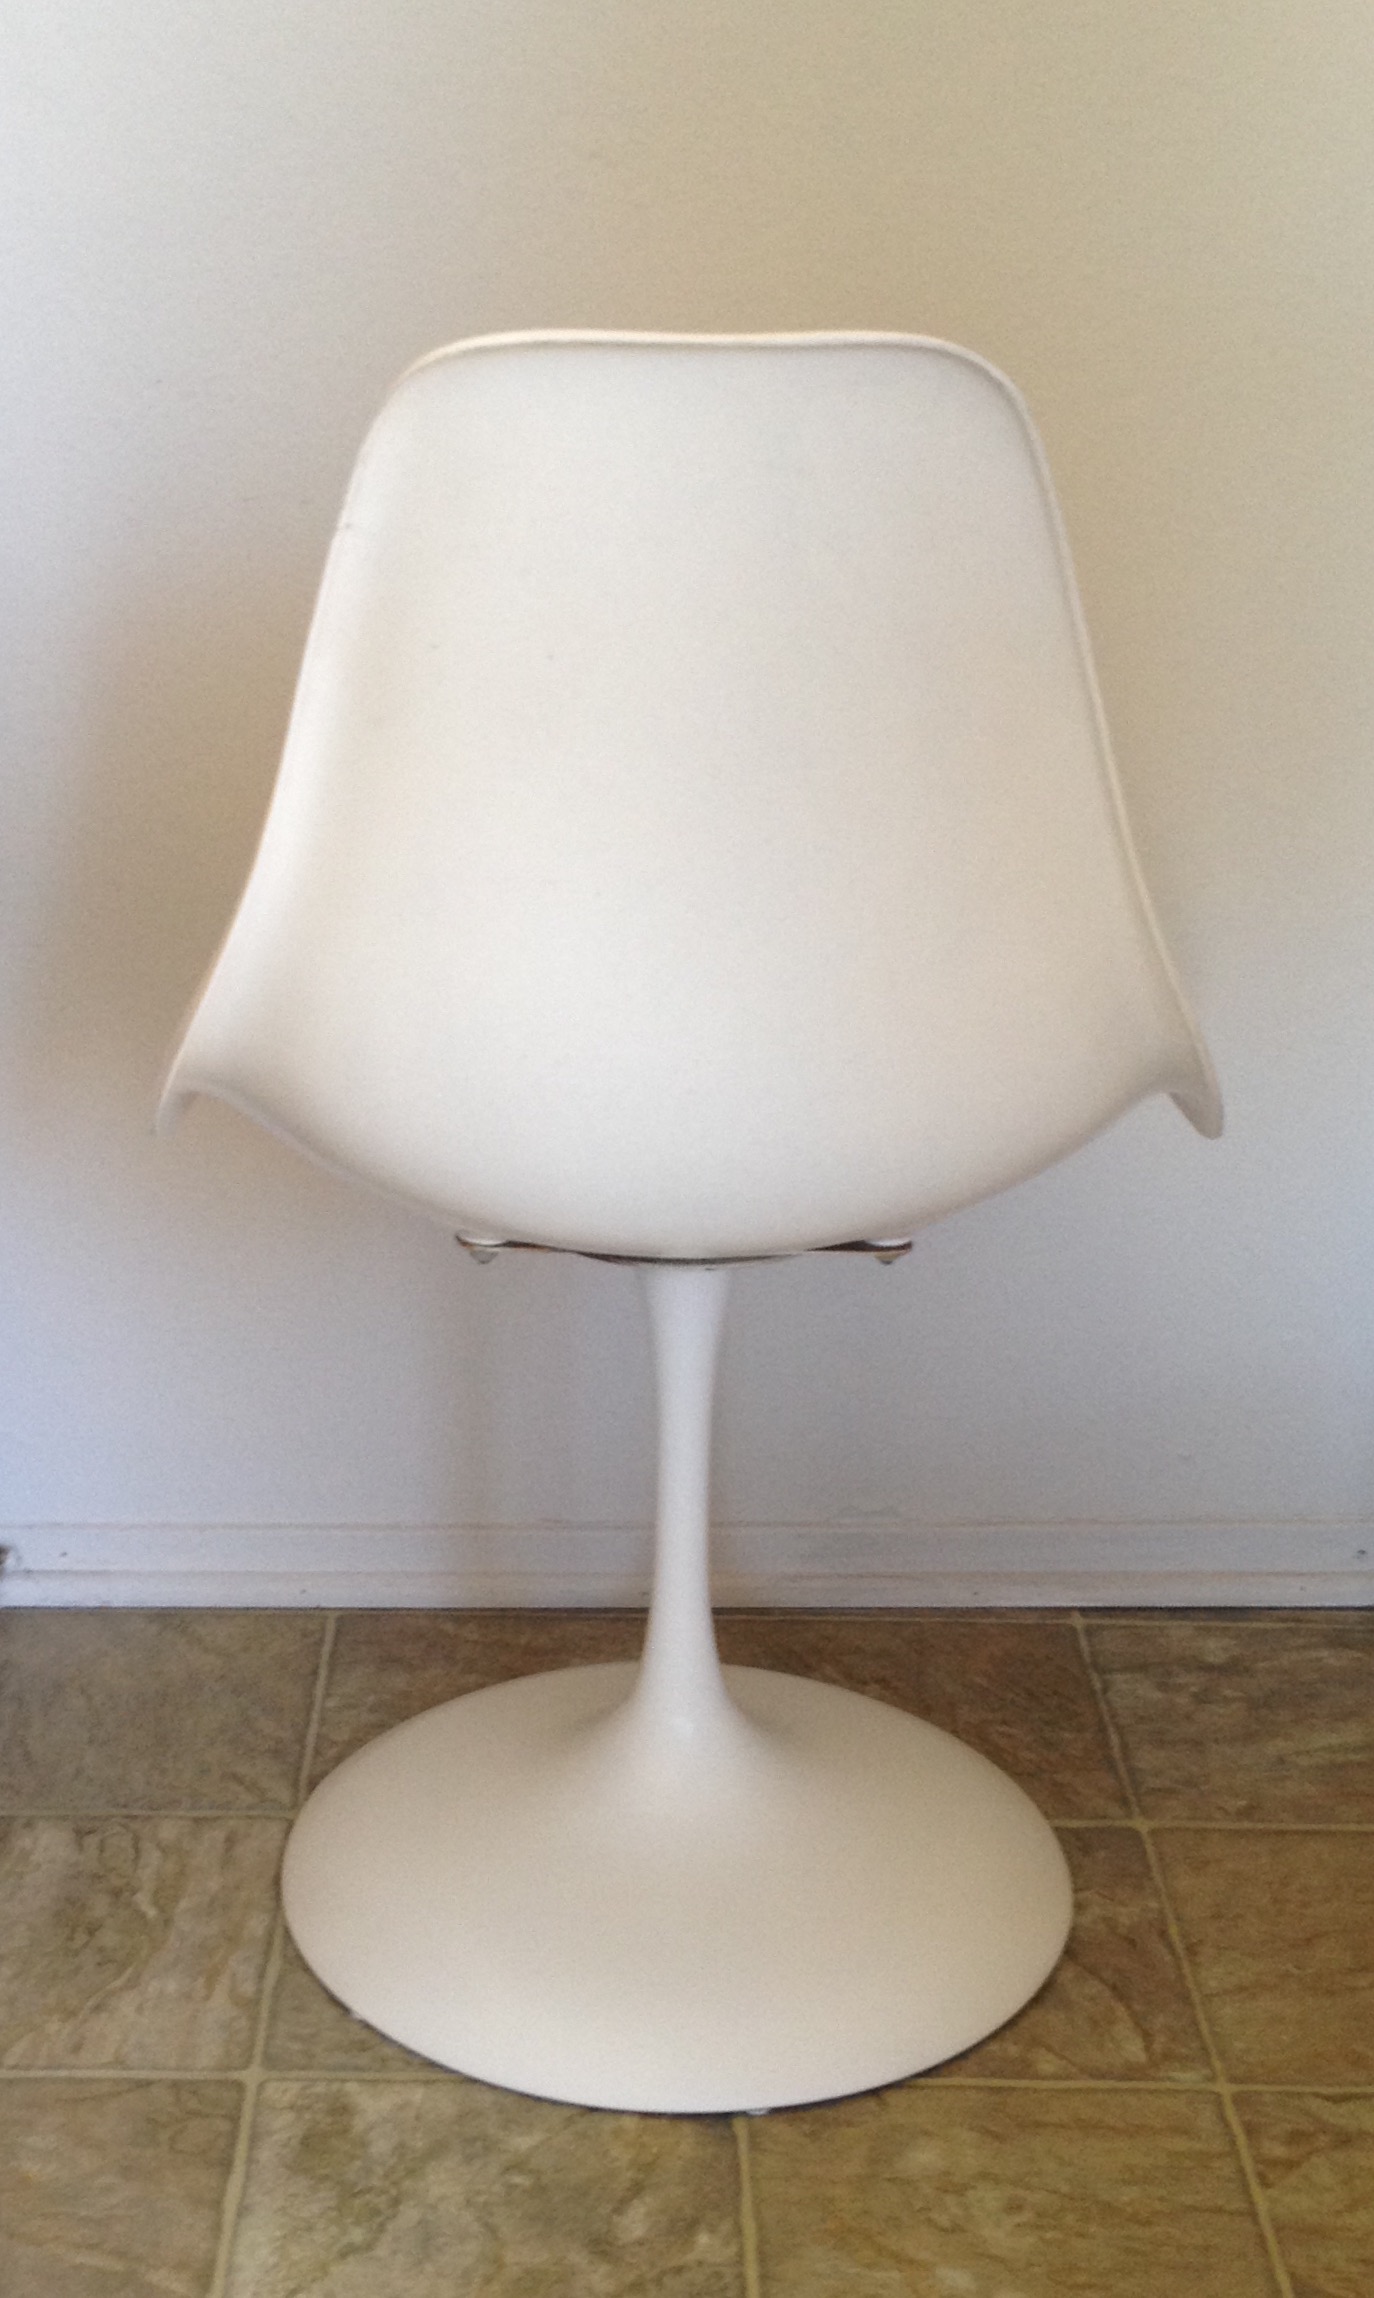
Recently, I was lucky enough to snag a trio of vintage Tulip style chairs for a steal. They were rusty, dirty and scuffed and needed a lot of love but, with bones like these, impossible to resist. Widely considered to be a classic of industrial design, the Tulip chair was designed by Finnish born designer Eero Saarinen in the mid 1950’s for Knoll. The smooth, modern lines of this chair have made it an iconic mid-century piece, and one I could not pass up.
Before, the “for sale” picMore before!
After giving the chairs a good look over, I realized that the fiberglass uppers were actually in pretty decent shape and mostly just in need of a really thorough cleaning. That said, it was a good hour of scrubbing and buffing to get them into tip top shape. I started with a little regular kitchen cleaner to get the first layer of grime off, I then followed up with a magic eraser. Which lived up to its name! The chairs were shiny in no time.
Clean and shiny. The holes are where the seat pads attach…more on that later.
The metal bases were another story – covered in rust and dings. Thankfully the rust was only surface deep and hadn’t eroded any of the metal too seriously. I started by sanding them (wearing a breathing mask of course!) with a coarse 100 grit sandpaper, which removed most of the obvious rust. I followed up with a 220 grit to smooth it all out. In between I used a wet rag to wipe away the rust and dirt that was coming off. Some parts of the bare metal were exposed, but I was able to get a smooth surface pretty easily.
Close up of the base
In much of my research of restoring tulip chairs I had read about the difficulties many people had faced with getting the bases back on the seats after removing them, so I opted not to take them off, and instead covered the seats. This was mostly because I get frustrated by mechanical things easily and knew I would probably struggle to get them back on in a timely manner. I’m also rather impatient. So trash bags and painters tape it was, and this worked perfectly.
High end paint protection
I then primed the bases using “Killz” spray on primer containing rust protection. After letting this dry, I used Krylon’s prime and paint in one, in Ivory. My only advice here is DO NOT USE KRYLON spray paint. I followed the instructions to the T, I shook the can for a good two minutes and the paint came out lumpy. Like little sand granule sized lumps. Freak out, lose my mind, lumpy. So, I had to let this dry completely and sand it off and start the process over (cursing Krylon’s name the whole time). Once I was back to square one, I used my old trusty Rustoleum Heirloom White. This was MUCH BETTER and I should have stuck with what I knew. Lesson learned.
One coat down
I did 3 light coats of paint, letting each one properly dry in between. I’ve learned over the course of a few projects that when it comes to spray painting, the best finish comes from multiple light layers, as opposed to drowning the first layer. Of course, I’ve read this a million times, but had to learn it for myself. So, take my word for it, it’s true. Once it was fully dried (I let it sit for 24 hours) I went over with a final layer of Rustoleum’s spray on Ultra cover clear gloss.
Finished!
So here is the mostly finished result. These chair pads aren’t the ones I’m going to ultimately use, they’re a temporary fix until the proper ones are finished. I just couldn’t wait to share, but will update the pics as soon as the new pads are complete.
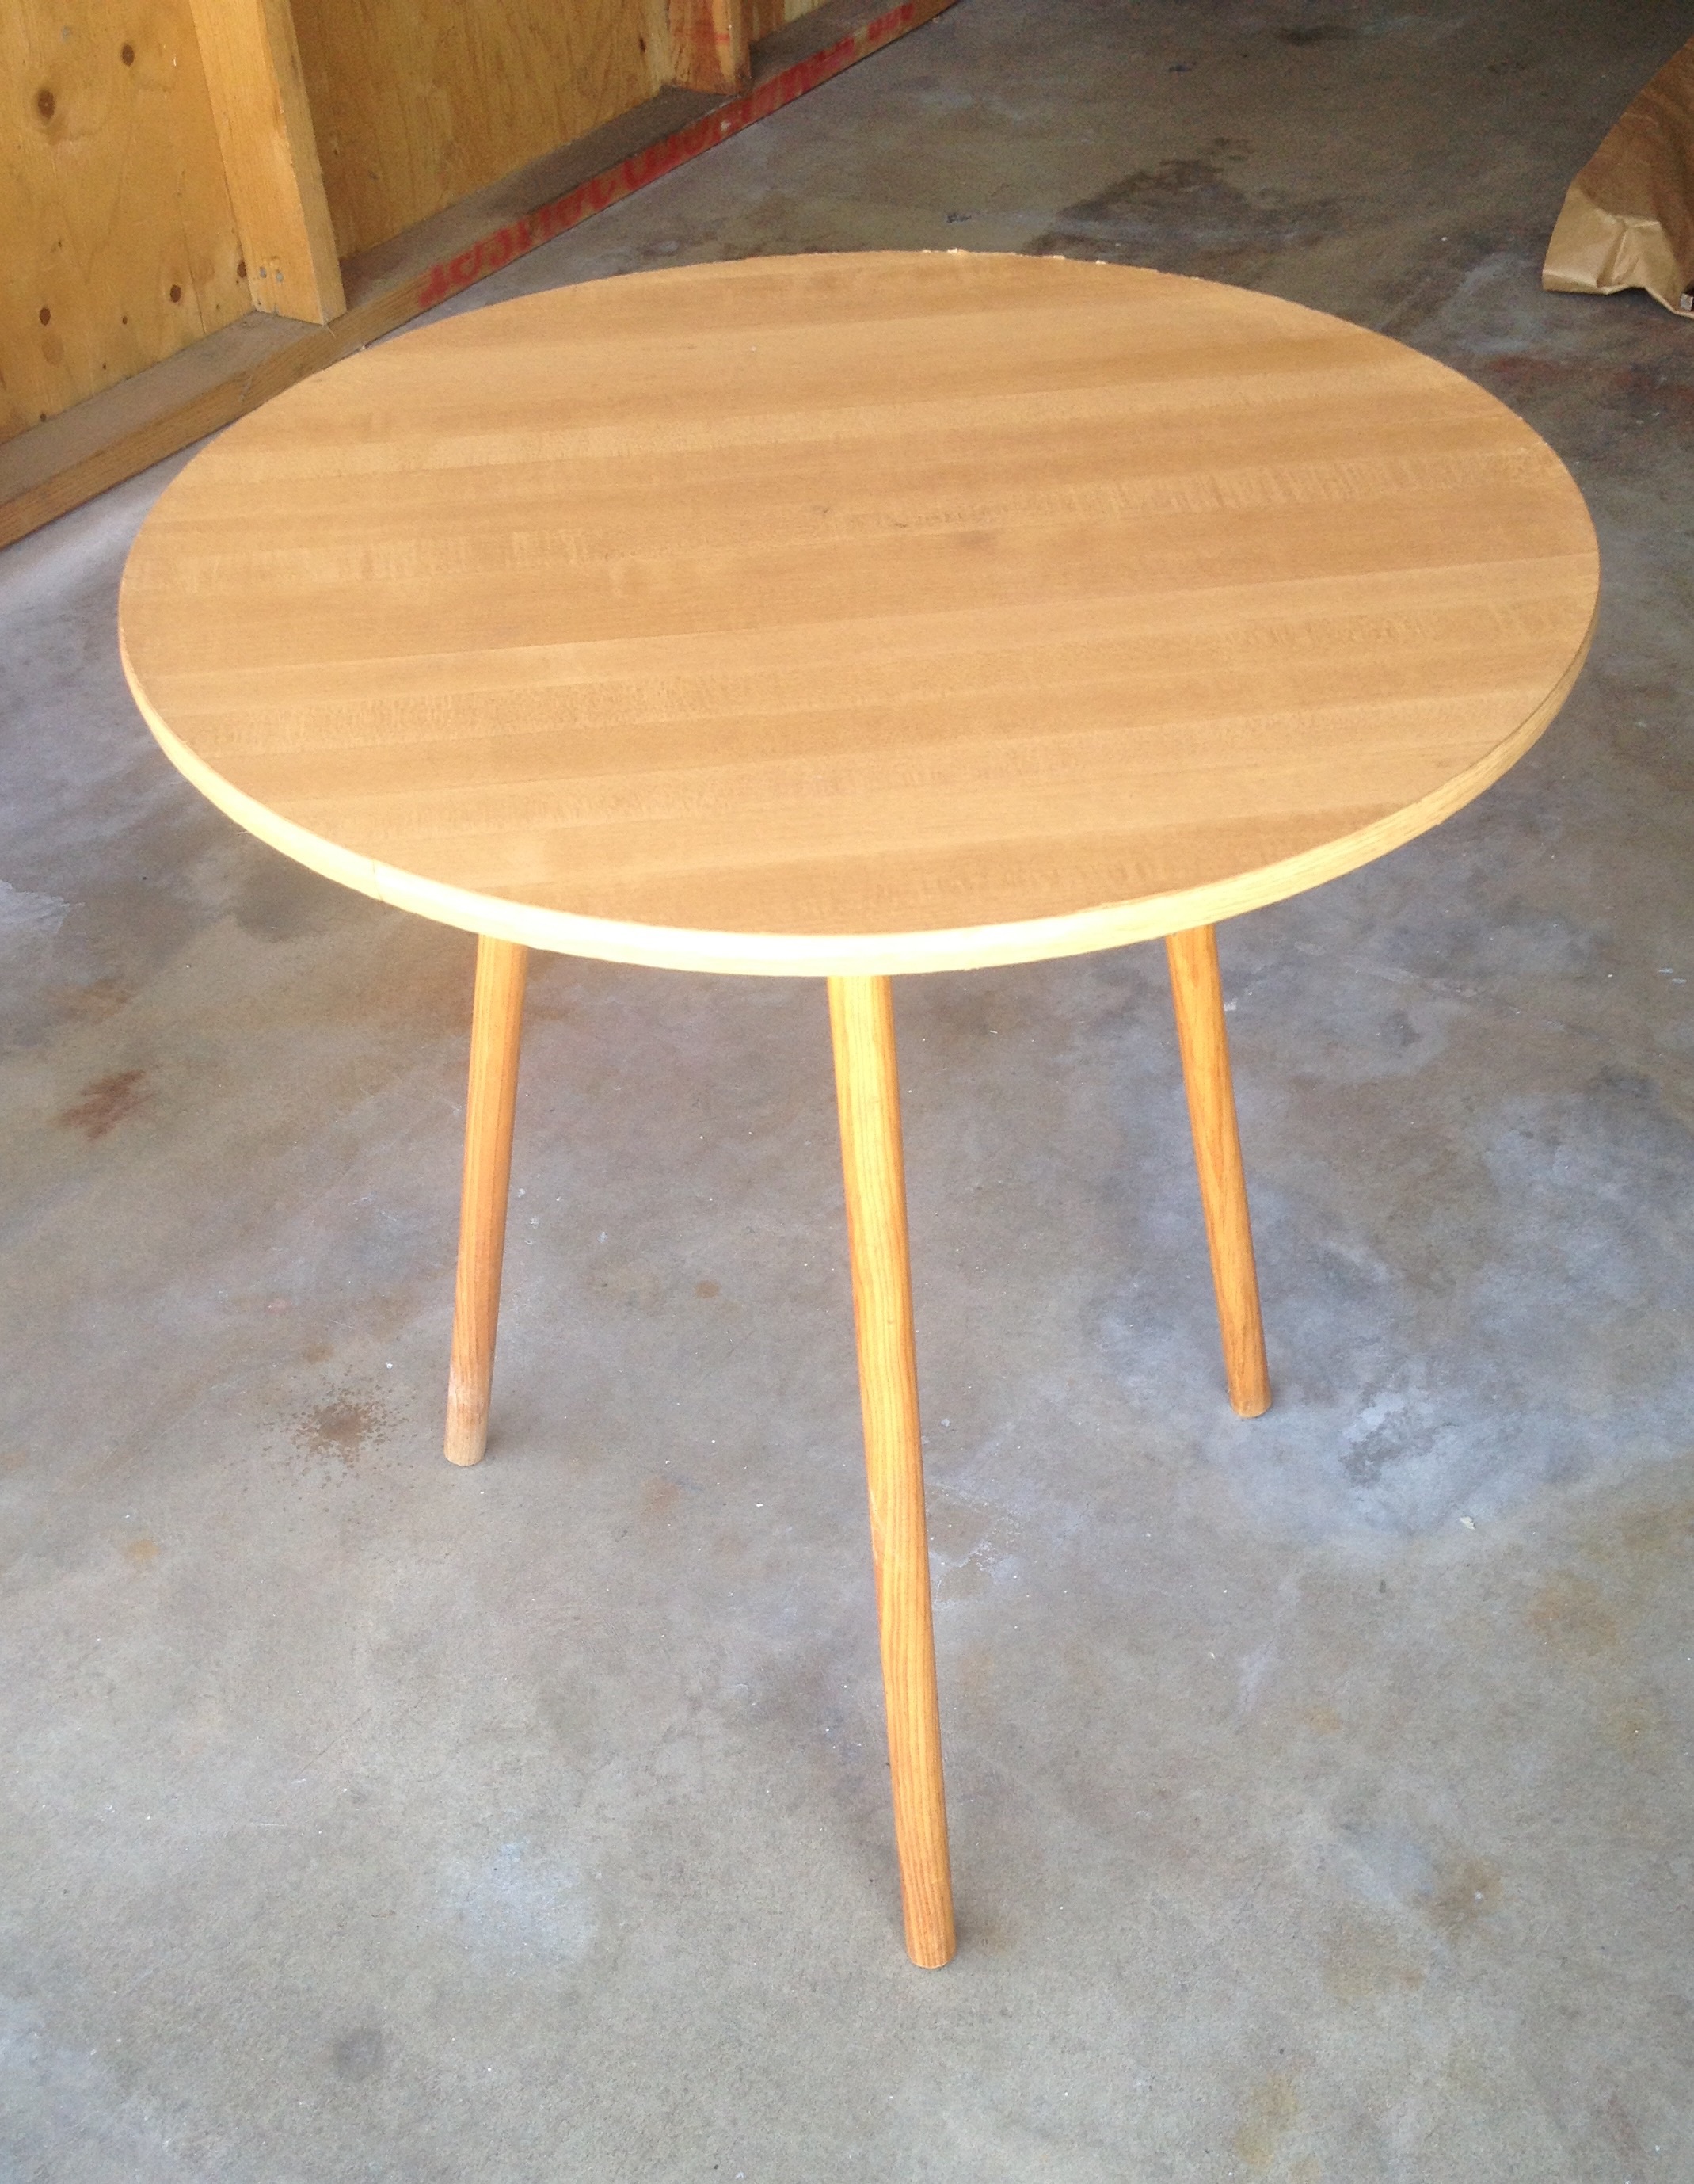
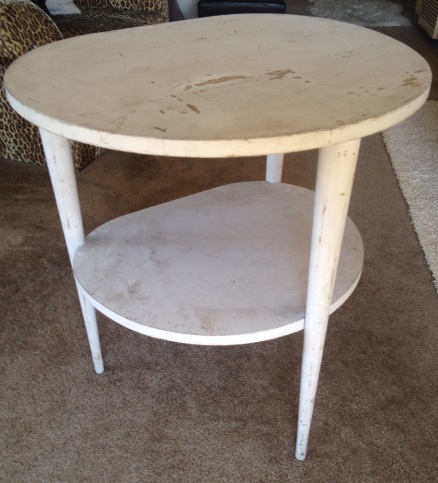
Itching to revamp something, this little table was basically a throw away I decided to play with. Nothing vintage about it, this particle board decorator table was plain, ugly and pretty hopeless, so with little to lose I went to town.
Before. An old, cheap throw away.
I removed the legs, the only real wood component, and lightly sanded the pressed wood table top. It had some raised water damaged spots, so I knew painting wouldn’t be enough to fix it. The trim was plastic faux wood, also virtually impossible to do much with. I used Kilz Spray on Primer to prime the table top and trim.
Primed and ready to go
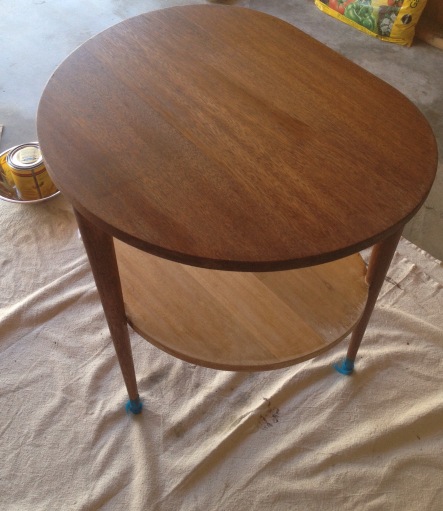
While that dried, I sanded the legs and used Minwax Gel stain in Hickory to stain them a lovely rich color. I’m obsessed with gel stain since it saved my last makeover project from disaster. It just goes on so smoothly, with little prep and still lets the gorgeous wood-grain shine through.
Legs stained
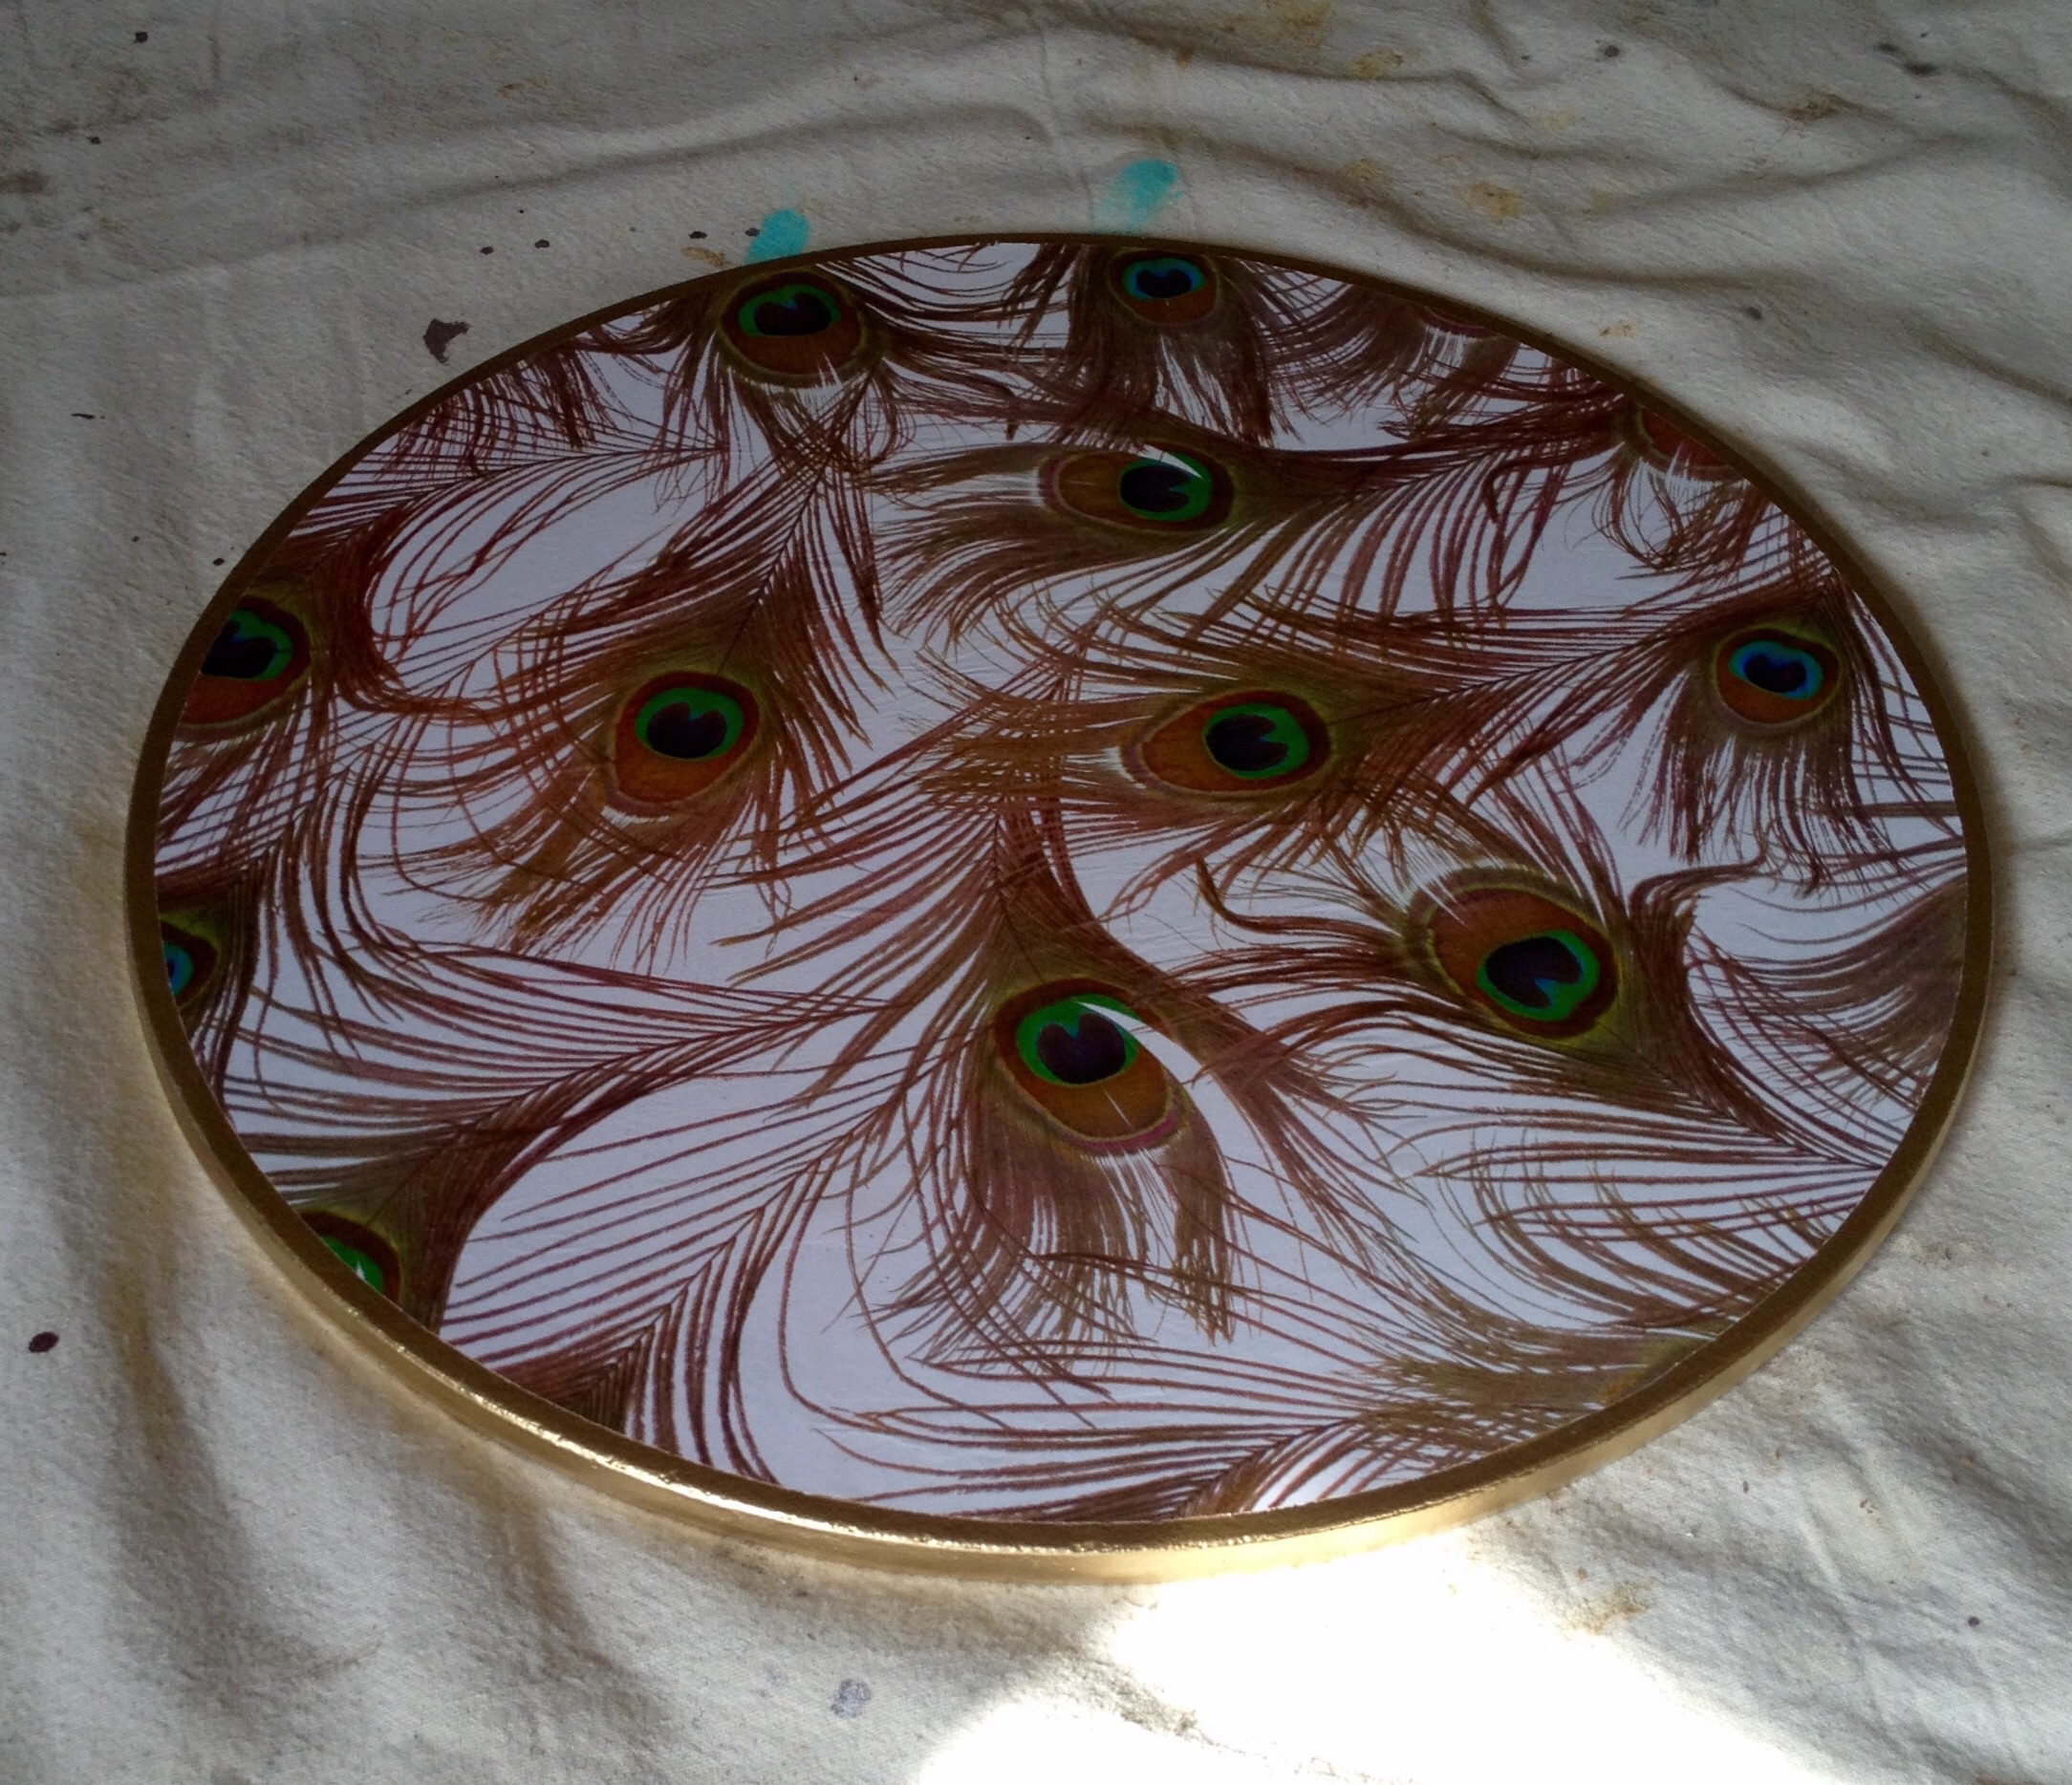
I used Rustoleum’s Gold Metallic paint to spray the trim and edge of the table top. I did two light coats and 24 hours later I used Mod Podge to affix some awesome peacock paper I had to the table top. I did 3 layers of Mod Podge on top of the paper, and on the side trim to seal it. This was my first time using Mod Podge, and even though I had followed the instructions and used a credit card to smooth the paper after adhering it, I had a little freak out moment when the paper appeared bubbly with tons of air pockets after the first coat. Not really knowing what to do next, I left it to dry over night, and was thrilled to see that once it had dried, all bubbles had vanished.
Mod Podge and Peacock paper perfection
As a final little touch, I decided to pay homage to mid century table legs and I taped off the bottom of the legs and used the gold spray to create the look of metal ferrules (leg caps). A nice little cheat that turned out wonderfully.
Fake it til you make it!
So there you have it, a quick and easy table makeover that turned the dumpster table into a fabulous, feathery showpiece.
Once in a while I come across a makeover project that makes me think “oh, easy!” and this little sewing cabinet was no exception. I mean, lots of flat surfaces and straight lines, an easy strip, stain and seal and “Bob’s your uncle!” Well, no. Not this time. I loved this little table from the get-go, I hated it for moments, but in the end, I’m still enamored. That top drawer that flips around to hold bobbins and reels, so unusual and unique. Hard to pass up.
So unique!
It wasn’t the 50 years of peeling paint underneath that was work, it was the freshest coat that had been slapped on top recently to cover it that made this project a sticky, messy nightmare. And all those straight lines? Hmm, yes, well, except for the grooves on the trim. The MANY grooves on the trim. Not fun. And then there’s the drawer fronts. Yep, they’re flat alright, flat…but textured. With this odd layer of some kind of raffia or thatched laminate stuff. Stripping wasn’t even an option for those parts.
So many layers!
So to say the prep was difficult, is an understatement. This wee gem took days of paint stripping, and for moments, a little piece of my soul. Then, those grooves…well, I tried everything from scrapers to wire brushes to steel wool to skewers. I finally got there, but in hindsight, sandblasting would have been the more effective option. Note to self.
Groovy. But not really.
Next up, sanding. This part was the easiest of all. My snazzy Black & Decker orbital sander whizzed through and made the surface silky smooth in a jiffy. Things were looking up, because the last step in front of me, staining, is the easiest thing ever, right? I tried Minwax stain in Special Walnut, it’s a favorite of mine. And do you think this wood would take the stain? Oh puhlease, no way. Admittedly, there were two types of wood in this cabinet, and in my enthusiasm I didn’t consider the impact this may have on the staining process….which was evidently huge. So the stain on top looked great, on the sides looked OK, and on the front, looked awful. It was a patchy, streaky mess, no matter what I tried.
Sanding = the only easy part
It was at this point I went back to the trusty internet and this is where Gel Stain SAVED THE DAY. Gel stain, unlike traditional stain, is more like a paint. So it doesn’t soak into the wood, it sits on the surface. It’s a similar process, wipe on, wipe off, but the result was perfection. I used Minwax Gel stain in Hickory, and it was a rich, gorgeous tone that still let the wood grain shine through. Most importantly, it was even, smooth and consistent. Not a streak in sight. This stuff is GLORIOUS.
Gel Stain saves the day
The last step was the drawer fronts which, as mentioned earlier, were this weird textured stuff which I actually kinda liked the look of, but wasn’t able to strip or stain (or remove completely without having to replace the entire face of the drawers. More effort than I was willing to put in at this point). So I painted. I had some amazing aqua blue “Island Oasis” paint left over from a table makeover, so I used that. A couple of chrome drawer knobs later, and a coat of Minwax polyurethane to seal the whole thing, and the cabinet looks stunning.
Aqua & Chrome. Swoon!
Worth the labor intensive process (I can say that now it’s over and I’m not knee deep in paint stripper and desperation)
Sarah from Atomic Magpie scored this sweet but battle scarred end table and transformed it into a thing of beauty. Here’s how she did it.
A few weeks back I found this beat up little end table on a local swap and sell site. Wedged in a corner, covered in office junk, paint scratched and dirty, and looking generally pretty sad. To many, not worth a second glance…but those legs! One look at the tapered legs, and this table screamed out “buy me! Save me! I am fabulous waiting to happen!” and I knew it had to be my next project.
Before, sad and dingy
I determined pretty quickly that the table was solid wood, covered with layers of lousy paint jobs over the original varnish. So I set about stripping the layers of dirt, paint and stain off, and uncovered a few little surprises along the way. The first happy surprise I unearthed was the brass ferrules on the feet of the table. Covered in decades of paint, these beauties were the cause of great excitement. A staple of mid-century design, I adore brass tipped table legs, and these ones were fantastic.
Oh the joy! Brass Ferrules
Next up, after stripping the top using an Eco-friendly, low fume paint stripper that I was able to use indoors (EZ Strip, Paint & Varnish Stripper) I found that I had in front of me a gorgeous mahogany table top, with a few water stains here and there, but nothing some sanding couldn’t remedy. The legs were a bit more work, requiring a lot of elbow grease, paint stripper and a wire brush. But it got there, and soon I had before me a stripped clean wooden end table with endless possibilities.
Uncovered – water stains and Mahogany
I sanded the whole table using a handheld block sander with 100 grit sandpaper. I finished with a fine sandpaper (220 grit) The good condition of the wood, and the stunning grain, made it an easy choice for staining rather than painting. I chose Minwax Special Walnut as the stain, and used a lint free rag to wipe it on, and then off. I did about 6 coats to get the colour I wanted, and had a couple of minor hiccups along the way, mostly with the legs and some small spots of old varnish I had missed. A quick go over with sandpaper on those spots, a touch more stain and the problem was solved.
Stripped and one coat of stain down
Early on, it was decided a pop of color would really make this table shine. Wanting to stick with the mid-century feel of the table, I chose a vibrant Aqua blue paint for the bottom shelf (Island Oasis by Home Depot, in matte/flat finish)
A quick coat of Minwax polyurethane over the whole table, and the old ketchup trick to polish the brass ferrules, and the end result was quite stunning.